Hackintosh and a 4K Monitor
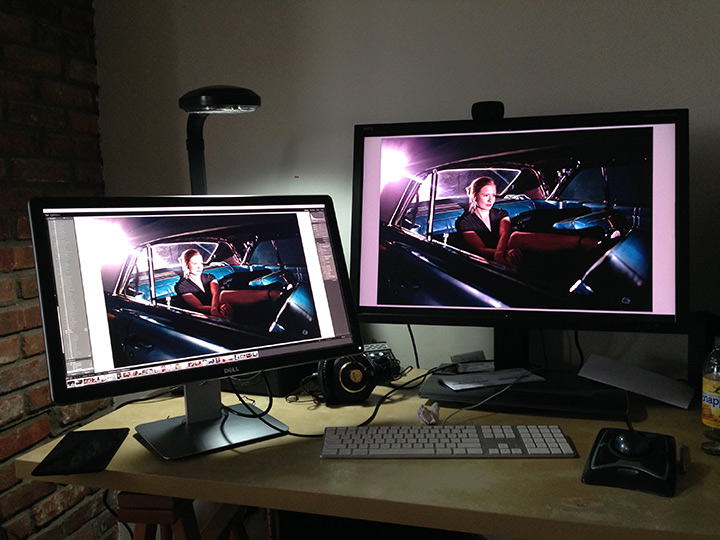
I had been limping along with a 5 year old NEC 3090 as it started to fail over the past few months, but didn’t want to replace it with another low DPI screen when I knew the 4k stuff was coming right around the corner. Then a few weeks ago Dell announced a 24″ UltraHD (3840 x 2160 pixels) display in their UltraSharp PremierColor series, the so-called 2414Q. I watched and waited for it to be available on Dell.com. Every morning waiting for the button to go from “Contact Dell” to “Buy Now” and it finally did a couple of weeks ago. After some delays in shipment my screen finally arrived this morning and I thought I’d write a little post on my experiences. This will be updated as I fiddle some more, so be patient.
First Encounter
I plugged the screen into my very fast i7 Ivy Bridge Hackintosh with a GTX 760 GPU and I got full resolution on the first try. The problem is that it’s stuck at 30Hz refresh rate. Now the GPU has Displayport 1.2 and in Windows 8.1 people have been running similar screens at 60Hz. Apparently the Nvidia driver built into Mavericks (there is no Nvidia web driver for Mavericks yet, or ever) does not support what’s called MST or Multi-Stream Transport. Basically the way screens these hi-res screens work is that you send two screens worth of data (that’s the Multi-Stream part) over the same cable and the screen just displays them next to each other on the same panel. No MST in the driver means I’m stuck at 30Hz. I’ve heard that the latest Nvidia Web Drivers for Mountain Lion has MST support, so I’m currently cloning my last 10.8 installation over onto an extra drive to see if I can get it working over there. Sometimes when you’re on the bleeding edge, you get cut.
The other issue I’m having is that the built-in resolution scaling is not working. So my screen is actually running at the full 3840×2160, which on a 24″ monitor is pretty tiny. Not completely unusable for messing about testing, but not the kind of thing you’d want to stare at all day long. So once I get the refresh rate problem nicked, I’ll figure out how to get it to show screen real estate something closer to 2560×1440 only with a whole lot more pixels to smooth things out.
That said, my initial playing around with images in Lightroom has made me feel similar to how I felt when I first upgraded to a color calibrated screen. All the little flaws in sharpness that you really didn’t notice before because you were going between a low-res overview and 100% are now glaringly obvious, much like they are when you look at a print. It’s pretty amazing. 180ppi on a desktop screen. Yum.
Round Two
My next move was to install 10.8.5 on an extra drive to see if the passing comment I read on an online forum was true. The idea was that the web drivers that Nvidia themselves released for Mountain Lion allowed for the illusive MST mode. No dice. Unfortunately I had the same results as in Mavericks. Looks like I may have to want for a driver update or some coding genius to come along and help me out.
HiDPI Mode (Kinda!)
Ok, so I’ve made some progress. I’ve got the screen running like a pixel doubled 1080p screen. So it’s showing the screen real estate of 1920×1080 while being really really smooth and sharp. To do this I had to enable HiDPI mode in Mavericks using this terminal command:
sudo defaults write /Library/Preferences/com.apple.windowserver.plist DisplayResolutionEnabled -bool true
Once I did that, 1920×1080 (HiDPI) showed up under the ‘Scaled’ section in the display preferences. The problem was that every time I tried enable it, the system would automatically select a refresh rate of 30.3Hz which made the Dell monitor just barf and show me a black screen. To get past this hurdle I switched back to ‘Best for Display’ and then selected ‘Scaled’ again while holding down the Option key. That allowed me to choose 30Hz AND 1920×1080 (HiDPI), and Voila! Retina style beauty. The next step is for it to give me a little bit more room to breathe. What I’d love is the real estate of 2560×1440 while using the pixels to smooth things out.
I still have the problem of 30Hz vs 60Hz refresh rate, but that may have to wait for a driver update that may or may not come. That said, we’re back in the “Ok, I’m going to keep this thing” camp. I don’t think it’s going back. Also apparently there is a bug in Chrome that makes it completely slow on HiDPI external monitors. So I’m temporarily using Safari for the time being.
More to come as I continue my troubleshooting…
Graphics Cards and Photoshop CS6 on Hackintosh
As most of my readers know, I use a Hackintosh as my main workstation. That means that I build my own computer from parts (motherboard, cpu, ram, power supply, drives, etc) and then use a bit of magic from www.tonymacx86.com to make it run the latest version of Mac OS. Which currently is 10.8 Mountain Lion.
Early last year I built a new and very fast machine based on the top-of-the-line Intel 3770K CPU, 32GB of RAM, 240GB Intel 520 SSD and the rest of it. State of the art and very fast. The only part of the machine that I kept from my old box was the Radeon 5770 video card. At the time running Snow Leopard and Lion this card worked just fine. Especially for what I need it to do. Mostly 2D work in Lightroom and Photoshop. And it should work well since it’s the the stock card (STILL!) in the Apple Mac Pro.
For some reason though, the combination of my new computer, old GPU, Mountain Lion, and Adobe CS6 Suite just doesn’t work all that well. If I leave on all of the GPU acceleration in the Performance tab of the PhotoShop Preferences, I get weird effects. The mouse lags a little bit behind my Wacom tablet cursor for example. And using things like a fairly small healing brush lock-up the computer for a quarter second with each stroke. Little weird things like that. Certainly not the kind of stuff that should be happening with a computer at this level.
I found that if I turned the acceleration down to ‘Basic’ that performance got smoother, but then I was losing some of the functionality inherent with Adobe’s inclusion of GPU acceleration in the first place. Needless to say, a little frustrating. After a bunch of setting changes and reboots, I’ve narrowed the problem down to the 5770 card. Not sure exactly what the problem is, but I’m not going to spend any more time fighting it. Time to move on.
So I started doing a little research into possible options. Apparently Apple as moved to Nvidia GPUs in their latest generation of machines, which is great because then there are native drivers for almost all of the latest 6xx series of cards. The move to Nvidia also means that I’d be able to enable CUDA acceleration in Premiere CS6 as well. Which apparently has drastic speed benefits in render times and such. TonyMac even has a list of natively compatible cards here on his site.
The problem is price. The card I had been looking at for the last month was the GTX 660ti. It’s basically the GTX 670 with one of the cores turned off. 88% of the performance for 75% of the price of the 670. The problem is that it’s still $300, and that’s a LITTLE too much for me to spend on a video card. Especially since I do little video editing and zero 3D gaming.
So I spent a few minutes this morning doing some extra research and found this page on Puget System’s site. Now Puget builds custom Windows workstations for higher-end clients and I trust their opinions. Basically they ran some Photoshop benchmarks with a bunch of modern GPUs and the results came out that the far cheaper GTX 650 gives me almost all of the performance of the high-end cards for what I use it for. And for only $120. SOLD.
The thing is that Puget was running the benchmarks in Windows and I’ll be using it in Mac OS, but I think that the underlying OpenGL code in the Adobe products is likely very similar, so I’m hoping that I just made out like a bandit. By the way, I ended up ordering the Gigabyte brand version of the 650 with 1GB of RAM from NewEgg. I love me some NewEgg and I get free shipping from right across the river in NJ with no sales tax.
It should be here on Monday at which point I’ll take the afternoon to do my planned reinstall of the OS and apps with the new card. Will let you all know how it goes.
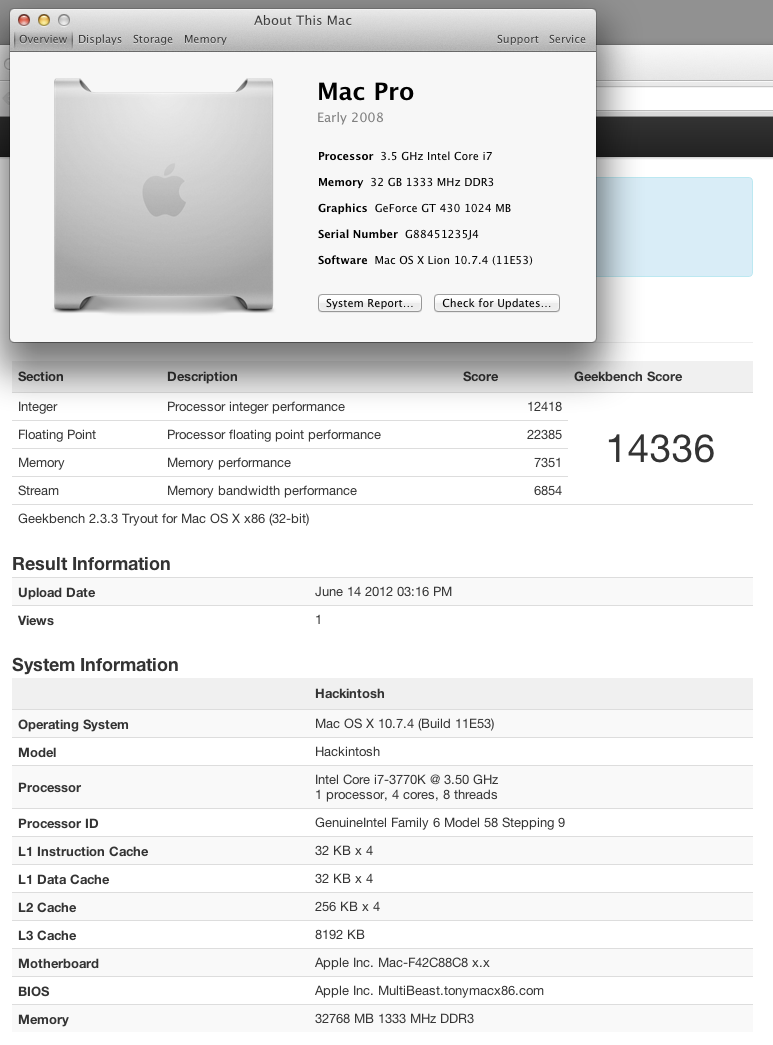
Selling my old computer for $500
UPDATE: The Computer Has Been Sold. But I’m going to leave this post up for historical reasons.
I just posted the following ad on Craig’s List, but I’d rather sell it to someone who reads my blog, so for you I’m lowering the price to $500 cash. You’ll save $100 on an already great deal. And yes, this is the hardware from the hackintosh I was using up until a few weeks ago, though I’m selling it with Windows installed. If you want to try to install MacOS again, that’s on you.
————————————–
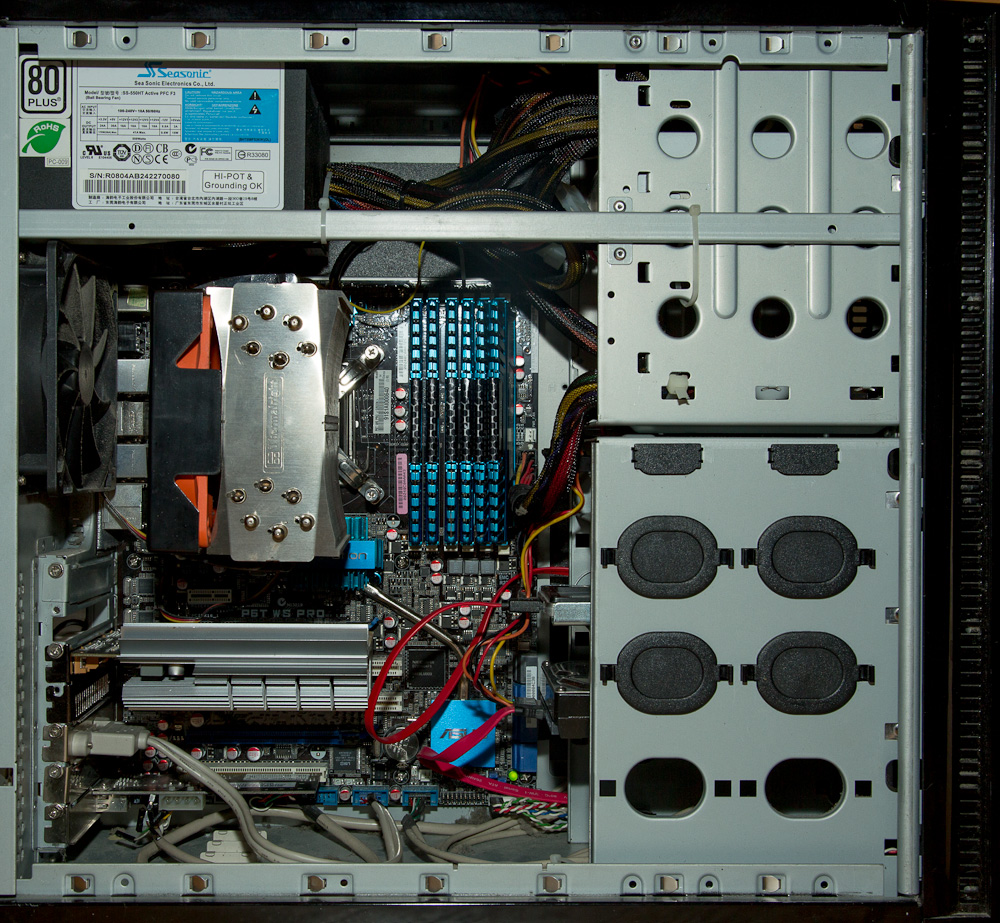
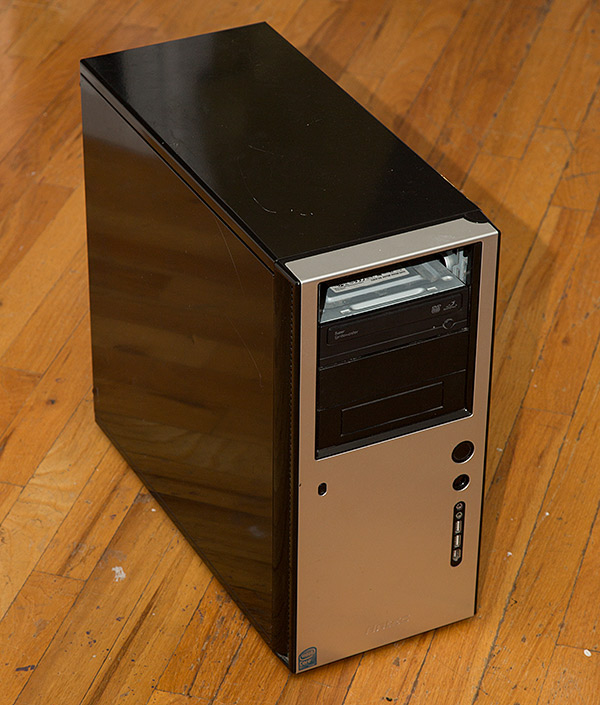
I’m selling my old computer, and I’ll admit that it’s making me a little sad to see it go. It’s a fast and very quiet little machine whose parts are going for about $800 on ebay right now if you wanted to send it to the chop shop. And that’s without the software I’m throwing in.
I’d rather not take the time to sell piecemeal so I’m going to give one of you a really good deal instead. Great for photo and video editing, web development, etc. I know because that’s what I was using it for.
The case is a little banged up (I’m missing one drive bay cover from the front), but as Han Solo once said, “She may not look like much, but she’s got it where it counts, kid.”
- Intel i7-920 @ 2.8GHz CPU
- Asus P6T Workstation Professional Motherboard
- 24GB of 1600MHz Corsair Vengeance RAM
- Zotac GT430 1GB Video Card
- 80GB Intel G2 SSD
- 1TB Samsung 7200rpm Hard Drive
- Samsung DVD-RW drive
- ThermalRight Ultra-120 Cooler with Nexus Fan
- Seasonic SS-550 Power Supply
- Antec Solo Case
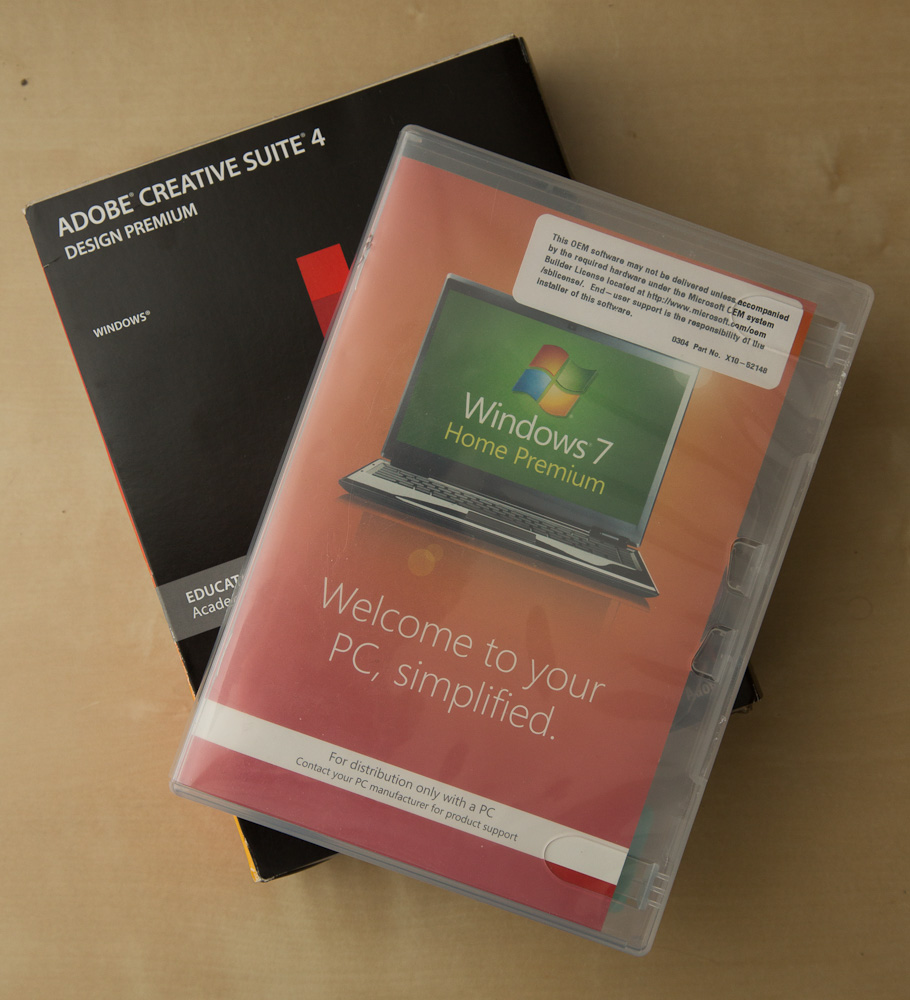
- Microsoft Windows 7 Home Premium DVD
- Adobe Creative Suite Design Premium CS4 Education Edition
Computer only. No Monitor, keyboard, mouse, etc. Well I guess if you really needed a mouse I could dig an old one up, but I’d be willing to guess that if you’re thinking about buying this machine, you’ve got one already.
Works great, being sold as is, with a brand new install of Win7 with all updates installed.
$500. First come, first serve. Email me ‘bill at billwadman dot com’
Some pictures:
Ivy Bridge Hackintosh Build Update 2
Last time we spoke a few weeks ago I had my new Hackintosh up and running, but only barely. The hardware was fine, but since Apple didn’t yet support the new chips and features it was a pale shell of the machine it wanted to be. Hacked kernel, no USB3, no power management. Basically, not quite ready for prime time.
Well on Monday, Apple announced their first Ivy Bridge based Macs in the form of the updated portable line. Theoretically, this included all the files the hackintosh community needed to finally get things working for me, but you couldn’t just grab the files off the drive of the new machines, apparently it doesn’t quite work that way. However at about midnight on Monday, Apple released a big 1GB update file for the new Macbook Pro Retina, which included new versions of all the necessary files. You couldn’t just install the update, but people in the forums started pulling things like the new Mach Kernel and power management out and trying to install them to see what happened.
So I decided to throw caution to the wind and did some manual shenanigans to install Lion 10.7.4 with the latest Ivy supporting kernel and some other stuff and it worked well enough that I was about to write a little post giving my step-by-step process, gloating a little, and then recommending that you wait until the TonyMac guys get the final solutions out. Great plan, however while I’m writing, they did just that.
BridgeHelper 5 was just released and gives full ivy bridge support, with power management and USB3. I plugged in my new USB3 drive dock and an ssd just to check and was getting 230MB/s reads (which is about the limit of the old Intel G2 drive I was using to test).
And perhaps best of all, the new machine sleeps and wakes up like baby, but without all the crying. Seriously, it’s nuts fast. Even booting from the Apple logo to login is about 5 seconds. I’m currently overclocking it to about 4GHz, but I’m going to shoot for a bit more as time goes by and I feel more comfortable with it.
The only little problem I’ve got at the moment is that one of my case fans is running at full speed though I’ve asked the EFI to slow it down. I’ve got to look into that, but really, can I complain? Finally got my Ivy Hack up and running. Moved my data drives over a few minutes ago. Let’s see how it feels in daily use. More as I explore but follow me on twitter if you want to keep up, I’ll post and forward more there for little things.
Ivy Bridge Hackintosh – Build Update
 I know it’s been a couple weeks since my last Hackintosh update and I apologize. There are a couple of reasons for this, for one I’ve been busy and secondly I’m in a bit of a waiting period which I’ll explain.
For those of you who haven’t been keeping up with the saga, I recommend you check out the first two installments in the series.
Building My New Ivy Bridge Hackintosh Workstation
So, since the last time we met, I’ve gone and bought all the parts I mentioned. The Intel 3770k CPU and Gigabyte Z77-UD5H Motherboard. For a cooler I went with a very reasonable $35 CoolerMaster tower cooler and it’s stock fan which is surprisingly quiet when it all comes together.
Once all the parts were delivered I spent an hour putting the whole thing together. Overall it was one of the easier builds I’ve ever done. In fact, once I had it all together and everything plugged in it looked too clean and empty, so much so that I had a terrible feeling that I had forgotten something important, but apparently I just did a good job in planning and building so everything went smoothly.
First boot was with a single stick of ram (still 8GB) in there to make sure nothing blows up. Plugged in a monitor, keyboard, and mouse and prayed as I pressed the power button on the case. Fans spun up, and the bios logo lit up the screen. Pressed delete to get into the new uEFI bios and set everything up. Everything was going swimmingly. To test and make sure everything was working correctly I intended to install Windows 7 and do some stress testing, but I kept getting errors while installing from the DVD which I’ll admit, scared me a bit. Only the next day did I figure out that there was a pretty nasty smudge on the disc that I didn’t notice which was causing read errors. Whoops. With that fixed, I booted up Win7, installed updates and drivers and proceeded to run Prime95 while overclocking the CPU a bit. I’ve currently got it at 4.3GHz at stock voltage, which is just fine for me right now.
With everything tested it was time to install MacOS. The thing is that there are as of yet no Macs which use this latest series of processors, which means that MacOS doens’t know what to do with it and thus just barfs if you try to install. So MacMan over at TonyMacx86.com did a neat little trick. You see, MacOS is based upon an open source UNIX kernel called Darwin. As part of there using it, the source code for the kernel has to be kept public, so MacMan went over and modified the kernel to recognize the Ivy Bridge CPUs and allow MacOS to install. Bridgehelper as it’s called gets it to install and run, but you can’t use any power management features or some of the chipset specific features such as USB3 just yet. It’s a temporary fix until Apple comes out with Ivy Bridge iMac and MacBook Pros in the next few weeks, at which point I’d imagine it’ll take all of a couple of days for the high priests over there to get everything happening smoothly.
So, until then I just don’t trust the new machine as my daily driver, mostly because I know I’m going to have to wipe off and reinstall everything in a matter of days, so I figure I’ll just hold off. However I can make a few observations. First is that this thing is FAST, as in really fast. Even in it’s slightly cobbled together state it boot in like 15 seconds from dead stop. Also, I put in two 2TB green drives and bonded them together as a software RAID-0 as my main photo storage which will be backed-up every couple of hours for security sake. I haven’t gotten to work off of them yet, but using the BlackMagic Disk Speed Test available for free in the App Store I was getting over 200MB/s at the beginning of the disk. Even with my 2.2GB library on there, I was still getting 160MB/s or more. This is much better than single drives and should significantly help the disk bottleneck. This faster storage subsystem plus Photoshop CS6’s background saving should speed up my workflow significantly.
There you have it. Not quite there yet, but well beyond where I was last time. Next update should be in a couple weeks when Apple puts out some Ivy Bridge machines. There are rumors that this is going to happen at WWDC in early June along with the early release of Mountain Lion. I guess we’ll have to see. Exciting stuff.
Ivy Bridge Hackintosh Update
 So here we are about a month after I first wrote about building a new Hackintosh workstation based upon Intel’s new Ivy Bridge CPU and Z77 chipset. Well the motherboards and CPUs have now been released and I’m ordering the rest of my parts today so I thought I’d give you an update.
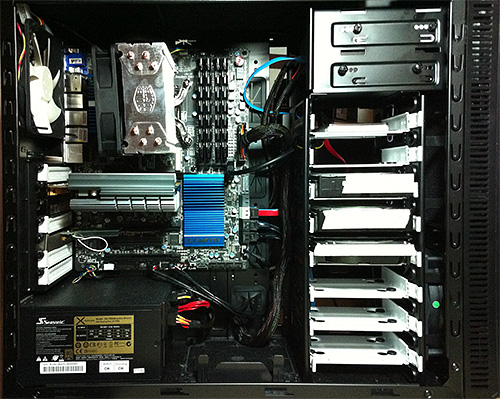
Up til now I’ve purcharsed the Fractal Design R3 case, 32GB of Mushkin Black RAM, a 240GB Intel 520 SSD, and a 750W Seasonic Power Supply. And here to the left what that looks like without the important parts. Not all that exciting, but pretty sexy, right? Those are 8 sleds over on the right there for hard drives. Yum. Basically it’s sitting there waiting for the real brains.
I’m not going to go through every detail again, just the stuff that’s changed since the last writing, so go back and check that post out to get up to speed.
CPU – Intel 3770K
As I had planned, I’m ordering the top-of-the-line unlocked CPU so I can do a little overclocking. So far is seems like the reviews are good but not amazing. Mostly due to the fact that it doesn’t seem like people can overclock Ivy Bridge quite as much as the last generation Sandy Bridge. People are not sure exactly as to why. Whether it has to do with the smaller die being a smaller area to try to pull heat from, or the new 3D transistors not being able to dissipate the heat, I’m not sure. The conclusion seems to be that you should clock it as high as possible on stock voltage, but don’t bother trying to push higher by giving it more juice. That said, since you get about a 10% boost in performance at the same clock speed due to improvements they’ve made to the logic, I’m ok if I only get to 4.5GHz (which feels a little crazy just to type). Either way, it’ll be a nice jump up from my 3.2GHz overclocked i7-920.
Motherboard – Gigabyte GA-Z77X-UD5H
I know, long name right? Well Gigabyte motherboards have always been a favorite for the Hackintosh community. They’re well-built relatively inexpensive boards which tend to be easier for the nerd-kings to make work with Mac OS. This is their current top-of-the-line model but without the built in bluetooth and wifi which I don’t need. Better power systems that the lesser boards, and with built-in Firewire 400 I need for my external M-audio interface and Intel gigabit ethernet. Also, extra SATA ports for more hard drives and more USB3 connections. The only thing it doesn’t have feature-wise is Thunderbolt. Apparently boards with built in Thunderbolt are coming next month, but I’m impatient, and honestly I don’t know that I need it right now. I use a DVI based display and prefer internal storage as a general rule. And if I need external, USB3 is plenty fast that a single drive can’t saturate it and a hard drive dock costs $30 instead of $300.
Perhaps the best part about the new Gigabyte motherboards is that it seems that they’re compatible with Mac OS power management out of the box. Which means no need for a DSDT file or anything. Sleep and Wake and Speedstep just work. Which is very exciting. That’s the one thing my currently Asus based machine doesn’t do well. I tend to shutdown at night and restart in the morning. It would be nice to be able to reliably put the machine to sleep.
Video – Zotac GT440 1GB
So it turns out that my genius plan of using the onboard Intel 4000 video was a fools errand. Both because the performance is pretty ‘eh’ and also that the DVI output on most of the Z77 motherboards are not Dual-Link which means they can’t push the full resolution of my 30″ NEC display. There are adapters that will do it but they cost about $100, which is more than a nice upgraded GPU would be. So in the end I’m ordering a discreet GPU to go with the new machine. I can’t stand the fan on the Gigabyte 5770 I’ve got now, so I’m grabbing the fastest fanless card for under $100 bucks. Which at the moment is the Zotac Nvidia Gt 440 with a gig of RAM. Should be fine for my purposes and dead quiet which is the goal.
Storage
The only other place I’ve had thoughts is on the main spinning hard drive storage. I mentioned last time that I was considering finding a RAID-5 card and using 3 drives as my main array. I’ve heard some horror stories and have yet to find an economical solution, so I think what I’m going to do is create a software RAID-0 across a couple of drives and have automated backups run every few hours in the background so I don’t lose everything in case on of the drives goes down. That should give me a pretty immediate doubling of disk performance while loading and saving images. Still cooking on this one. If anyone has any advice, I’m all ears.
———
I think that’s about it for now. More to come in a few days when I start to build this thing.
Building My New Ivy Bridge Hackintosh Workstation
 While I’m writing this sitting on my couch with a Macbook Air, when I really need to get work done I do so at my desktop computer. Old school towers are still great as a photographer’s workstation and there are reasons for that. You can use the best and fastest components, they’re easily upgradable, they can fit more storage, and for me, they’re fun to build.
As many of you who read my blog may already know, I use a Hackintosh as my main desktop. Have so for about a year now. For the uninitiated, a Hackintosh means that I’m running Mac OS X on a computer that’s not built by Apple. Some people install it on Dell and HP machines, but in this case the computer was build by me from parts about 3 years ago. At first the OS X thing was an experiment but I’m going to stick with it.
My current i7-920 machine is still relatively fast, it’s got 24GB of RAM and 6+TB of drives, but it’s now 3 years old and I’ve been itching to upgrade. To that end I’ve started putting together the pieces I need to build my new machine and thought I might document the process. The main catalyst is the upcoming release of the new Intel ‘Ivy Bridge’ chips which should happen in the next few weeks. So while I’ve got most of it planned out, there are still a few grey areas to fill in as I go.
There are a few things about my current machine that I’d like to address in the process of building the new one. First, I can’t stand the noise from the fan on the video card. I’m a pretty serious stickler for quiet computers, and the rest of the fans in my machine were bought with that in mind, but the Gigabyte 5770 ‘Batmobile’ card I’m using spins up far too often. And since I never game and really only use Lightroom, Photoshop, and Chrome with any regularity, I don’t really think I need a fast card, so I’m going to try to go without. Also, while I’ve got plenty of storage which I back-up nightly, I’d really love to speed it all up and simply my drive layout, so I’m looking into running 3 drives in a RAID 5 array as my main storage.
So here’s my planned parts list so far:
CPU ~$330
Intel i7-3770k
Top of the line consumer processor. Quad core @ 3.5GHz stock, but it’s unlocked which means it’s begging to be over clocked. I’m going to try to get mine to 4.5GHz with some aftermarket air cooling. I’d love 6 core, but for the work I do I don’t think I’d get enough of an advantage to justify the cost increase.
Motherboard
No idea as of yet since none have really been announced. For some reason, Gigabyte brand motherboards have become the most well supported in the Hackintosh world, so I’m leaning towards those for now. I’d love to have Thunderbolt built in, and there are a few manufacturers who have announced it as a feature. All Thunderbolt controller chips are from Intel right now, so whatever they’re using SHOULD be compatible with OS X without too much work. The new boards will have USB3 anyway which should be plenty fast enough for backups using bare drives in one of those hard drive docks.
One big motherboard question is if I can get away with using a Micro ATX sized board instead of a full size ATX. I don’t need the extra slots, and would love to shrink the size of the case I need in the process. The motherboard is the biggest hole in my plan right now.
Video Card
None
Well not none, but my plan it to try and use the new Intel HD4000 graphics which are built into the 3770K CPU as my graphics card. Based upon everything I’ve heard, it should be plenty fast for what I need it for which is almost entirely 2D work. Photoshop CS6 relies on OpenGL much more leveraging the same graphics subsystem as Premiere, but I still think I might be able to get away with this latest on-board graphics. Cost is a great advantage, as is the lack of additional fans to cool another card, which solves one of the problems I have with my current rig.
Worst case scenario, I’ll get a lower-end nVidia passively cooled card like a GT430. Let’s see if we can do without it though, shall we?
RAM ~$250
32GB DDR3 in 4x 8GB DIMM
I’m planning to put 32GB of RAM in there. An upgrade from the 24GB I’m using now, and a no brainer for Photoshop use especially since RAM is pretty cheap at the moment.
Boot Drive
Intel 520 240GB SSD
This one I already bought last week because it was on sale. I went with the new 240GB model Intel 520 SSD. It wasn’t cheap, a bit over $300, but it’s gotten great reviews and it’s crazy fast. My current machine uses an 80GB Intel G2 SSD from a couple of years ago and I’ve had zero problems with it. Which is something I can say of almost every Intel product I’ve ever bought. They do reliability right.
Storage
4 or 6GB RAID-5 Array
So I currently use a pair of 2TB Western Digital Green drives which I backup nightly to sparse images on a 3TB Hitachi drive using Superduper! I’ve also got an additional 2TB ‘media’ drive which I use to store music and movies and software downloads and such. I back this one up every once in a while but it’s not vitally important stuff.
What I’d love to do is take 3 of the 2TB WD drives and create a RAID 5 array. This would have the benefits of having just one photo drive I have to keep track of, a big speed boost because of the striping data among the drives and a certain amount of data security due to the redundancy of RAID 5. I’ve looked into a RocketRAID card to do this for me as I want to use hardware RAID, but I haven’t come down to a best fit yet. Advice on this matter is appreciated.
The one downside to a big array like that is that my backups might be a bit more of a pain in the neck as I’ll need another array or a single big 4TB drive to backup to and those aren’t cheap right now. In fact hard drives in general aren’t cheap right now due to the floods in Thailand last year, but they’re getting better.
Power Supply ~$120
Seasonic X750 750W
I’m a fan of Seasonic power supplies. They’re built like tanks, and they’re quiet and they’ve never let me down. I saw a great deal on this power supply last week so I snapped it up. Best part about this model is the fact that at under a 20% load, the fan doesn’t turn on at all. So it’s crazy quiet. It’s also got modular cables, so you only plug in the ones you need. No more extra cables to hide away. Looking forward to trying it out.
Case ~$120
Fractal Design Define Mini
If I can pull off the MicroATX motherboard, this is the case I’m going with. If I can’t I’ll get it’s big brother. Either way, I’ve heard great things about it. Resonance dampened panels and rubber dampened sleds for 6 hard drives. More than enough for my plans.
———–
So that’s what I’ve got so far. Hopefully Intel will announce the new chips in a week or two and we can get on with the fun of building this thing out.
Any suggestions or advice on the selections above are appreciated if you want to leave a comment.
More to come…
Macbook Air 13″ (2011) First Thoughts
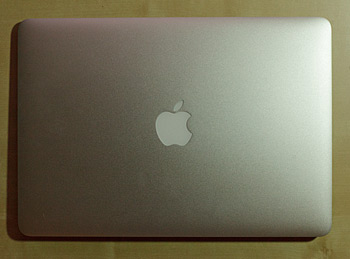 My 2008 unibody aluminum Macbook, yes that one that they only made for about 5 months, was getting a little long in the tooth. So I gave my partner Heather my unibody as a replacement for her black Macbook and started looking at the upgrade options.
First off, I’d like to point out that at no point is my laptop my main machine. I’ve got a very powerful Hackintosh with 24GB of ram and 9TB of drives with which I do serious work. My laptop is usually just sitting next to me with my email up, or for skyping with the family, or reading the news on the bed. Occasionally however, I travel with it and use it to backup my cards and do some basic Lightroom adjustments and minor Photoshop before posting an image or two online.
An iPad was ruled out immediately. I had bought and sold one a few months ago when the iPad 2 was released. I was largely unimpressed. I like having a keyboard and create more than I consume, so I needed to move further up the chain. I knew I wanted something light, and I don’t need the juice in a Macbook Pro. Again, this isn’t my main machine. This left me to consider the new Airs.
With the i5 processors and 128GB SSD for a reasonable price, I was mostly sold from the start. The main question was deciding between 11″ and 13″. I love the idea of the 11″. Little tiny thing not much bigger than an iPad that you can run actually software on. However, in the end I went with 13″ for a couple of reasons. First, when working with pictures, the extra pixels make a difference. Especially the 144 extra vertical pixels, especially in Lightroom where the filmstrip takes up vertical space along the bottom. Secondly, the 11″ stock configuration has a slightly slower CPU, 1.6GHz vs 1.7GHz, which may not sound like much, but modern Intel chips do this neat trick where they overclock themselves when not using all the cores. The 1.6 chip overclocks to 2.3GHz where the 1.7 overclocks to 2.7GHz, and that extra 400MHz can make a difference when you’re rendering a couple hundred RAW previews which generally happens on a single thread.
So I stopped by the Apple store down on 14th street, and picked myself up the bottom of the rung 13″ with 4GB of Ram and 128GB SSD with my ASMP Apple discount. Came to about $1325 after tax. Just for a minute consider the amount of computing power in a chasis less than 3 pounds which costs so little. That’s about half what a decently set up original IBM PC would have cost, and that’s not even taking inflation into account. Moore’s law is your friend.
I brought it home and then agonized with myself for a couple hours over whether I should even open the box. $1300 is not a lot for what you get, but it’s certainly not pocket change. And how often do I NEED a laptop anyway? Shouldn’t I just save the money and take it back? I constantly get buyer’s remorse after large purchases. It’s like my father is constantly behind my shoulder making me feel guilty. Well, I won’t build the suspense any longer, I opened the damn box up and here are a few of my thoughts based upon less than a day of use.
First off it’s fast. Like really fast. But this is to be expected, it’s got a fast SSD in it. My first in a laptop. So not only is everything nearly instantaneous, even the boot time isn’t more than a few seconds really, but it’s also almost completely silent. The only thing I’ve found to get the fans going so far is skype video, but that’s to be expected. I would say that if you weren’t doing serious photo or video work and instead using the computer for what other people use their computers for,( i.e. web, email, facebook, calendar, music) that this would make a fine primary machine as long as you can live within 128GB of drive space. You would probably want to get an extra external drive. That said, it would probably be the fastest feeling computer most people have ever used. It’s that zippy.
Let’s talk about the screen. It’s got a nice resolution for the size (1440×900) and it’s plenty bright, but it’s still a TN panel, so there is still some color shift in both the vertical and horizontal axis. And I suspect the color depth is 6 bits per channel at best. There’s some serious dithering going on in the radial gradients on the login page. It’s better than my last Macbook though, and considering the size of the machine it’s in I’ll give it the benefit of the doubt. It wouldn’t work as your primary monitor, however, and sadly, Apple’s stock profiles suck. Whatever white point they use is way off from the 6500k that I work in. Also as it turns out, the software that is used with my i1 Display 2 colorimeter is PowerPC based. So without Rosetta in this new OS, I’m up the creek on pulling this screen into shape. So I’ll have to find a way around that profiling issue before giving this the seal of approval from a color point of view.
Battery life is impressive so far, I’ve not used it past 70% or so, but it looks like it’s between 5-6 hours of my normal use. When I was on Skype earlier it quickly dropped the estimated time down from 6 hours to 2 hours. So be warned that it’s not limitless. I have still not tried pulling some RAW images in to see how they’re handled. On my old machine, loading in 150 images from my 5D2 and letting it build previews would quickly leave me with half my battery in only 15 minutes. Hopefully this will be a bit better.
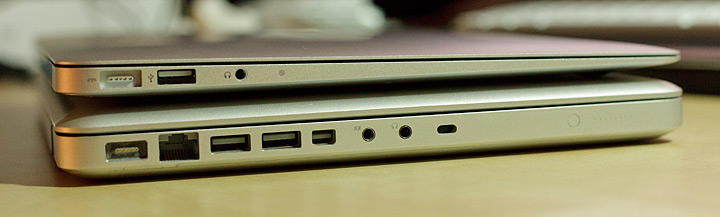
It’s obviously a light laptop, though somehow it doesn’t feel as light as it is to me sometimes. Pick up my old one in one hand, and the new one in the other and there’s difference, but it’s not the night and day difference that the thickness of the machines would imply. Maybe that’s just more of my lust for the 11″ which is another half pound lighter still. Also I’ve found when sitting on the couch typing, like I am right now, it’s almost too light in the base. Not quite enough to counterweight the screen to keep it stable under your hands. I’m certainly not asking for it to be heavier, but it’s an interesting unintended consequence.
Overall, so far, so good. It’s fast, light, relatively small and does everything it’s supposed to do well. I’ll give it 100 RAW files to chew through tomorrow and get back to you on how it acts as a travel photo machine. My guess is that within the limitations of the screen and battery, it’ll do just fine. By far the nicest laptop I’ve owned when you average everything out. But then as technology improves, that’s exactly how it should be. Better, faster, cheaper. Keep it up, guys.
UPDATE:
Ok, so I’ve imported 206 21MP RAW files into Lightroom 3 and rendered standard previews. The battery went from 48% to 42% in the 12 minutes or so it took, and the laptop fans didn’t sound like they were trying to take off for Madrid. All a huge improvement on my old unibody Macbook. Part of this is due to the more efficient/lower voltage CPU I’m sure, but I’ll give some credit to the SSD as well. No spinning means faster disk access and less juice used.
Now if I can just figure out a way to profile this screen without buying a new puck and we’ll be in business.
Hackintosh Update: 3 Months In
 Today marks the 3 month anniversary of me installing Mac OS on my custom built i7 machine and using it as my primary computer. 3 months with no problems whatsoever. Well, that’s not true, there are a few niggling things on the list, but they’re pretty minor overall.
1) I’ve got to type “Graphics Mode”=”2560x1600x32@60Hz” in the bootloader or else the desktop never shows up. Apparently there is a way to put this in some config file so that it happens automatically, but I’ve tried everything I can find written up online to no avail. If any geniuses out there have any ideas, let me know. This is not the norm on hackintosh, just a quirk of my own configuration.
2) I really miss being able to hot-swap SATA drives. I’ve got one of those slot load drive bays on the front of the computer which is great to pop in some old drive to find something in cold storage, but MacOS doesn’t know what to do and the drive never mounts. Really frustrating and silly. Come on Apple, get with the future.
3) I’m a little concerned with Apples “Lion will only be available through the online Mac App Store app” stance. There’s got to be a way to put the image on a disk, how else would you reinstall the OS if you have a hard drive failure? I’m sure my fellow compatriots will come up with ways around anything, but I hope it doesn’t slow down it’s ‘time to my SSD’
4) Every 10th time or so, the apple keyboard I’m using doesn’t get found on boot and I’ve got to restart. Not sure if this is an apple keyboard thing, or an Asus Bios thing, or most likely the USB extension cable I have to use because the one on the Apple Keyboard is about 6 inches long.
Those few things aside though, I’m really loving it. Mac OS is so much better on a really fast machine. And once you get some keyboard commands down. If I had to buy a computer right now, I’d probably build a nice Sandy Bridge Hackintosh. Though I might wait for the high-end 6 slot motherboards to come out, so I can use more than 16GB of RAM (4x4GB Dimms, I know 8GB dimms exist, but they’re crazy expensive right now) I upgraded to 24GB last month and I don’t really want to go backward. That said, I have no problems with the performance of my computer. It’s crazy fast. So if you’re technically savvy and want to have some fun, I suggest giving the Hackintosh route a shot.
Here’s a link to my previous Hackintosh buyers guide.
New to Mac OS – Part 1 Things That Drive Me Nuts
 As most of you who read my blog know, I just recently moved to Mac OS 10.6 as my primary OS. Part of this was just an experiment, part of it is interoperability with Mac OS formated disks from other people which I need to use, and part of it was the fun of getting my Hackintosh to work (I’ve had a unibody Macbook for years as well but that’s not up to what I need to do photographically). That said, I’m pretty happy overall. There are still a few things that drive me nuts. Thought you might get a kick out of my misery.
Things that drive me nuts about Mac OS:
– In Windows I loved that I could maximize my windows to use all the screen real estate and still jump between them because the taskbar is always down the bottom of the screen. I know there is a full screen mode on a lot of apps, but most of the time I just want to click a button and not be seeing all the other crap on the desktop. If you’ve got Photoshop and Dreamweaver and a browser open, you end up clicking on the wrong thing and switching applications when you didn’t mean to. Miss the edge of the window when you click to resize and POOF all your toolbars are gone and you’re in Finder somehow. The green window button makes things bigger, but seems pretty unpredictable as to what it’s going to do exactly.
– Hide vs Minimize. Two ways to get rid of a window. You can minimize it to the dock but to get it back you’ve got to click it’s little icon down on the right side of the dock (and you wouldn’t notice it if you hide your dock). Clicking on the related application icon in the dock doesn’t bring the minimized window back up, you have to explicitly do it. The other option is to hide the app (command + H) which makes is disappear and clicking the app icon DOES bring the window back. Oh and minimized stuff shows up in Expose, hidden apps do not. So you have to know that you’ve hidden the window, otherwise they’re in the ether. Weird stuff.
– In Photoshop CS5 on windows, you can be in full screen mode and still have your image windows as tabs. I have yet to figure out how to do that on the Mac. So jumping between images is a matter of using the Windows menu.
– Icons don’t reflow to fill available space if you resize a Finder window. I know this is an old Mac thing and I understand how this could be useful if you like to layout your icons in a certain way to help remember spatially what is what. But it’s annoying when you just want to see more in the window.
– Resizing from on the bottom left corner. Why not let me resize from any side of the window I want. Annoying. This one has been around forever and is apparently changing in Lion. Long overdue.
– In Finder you can’t cut and paste files to move them. You’ve got to copy them and then delete the originals. Oh and the copying versus moving sometimes gets me mixed up on when it does which and what keyboard modifier key I need to use.
– The whole keeping applications open even when no windows exist is a hard thing to get used to too. I guess when you’ve got 12GB of RAM you can let Text Edit stay in memory, but it’s still annoying that I just opened up a .txt file to copy a chuck of text and then I’ve got to go manually quit out of the application instead of just closing the window. That’s a paradigm shift I guess.
————-
That’s all I can think of at the moment, I’m sure there are more.
Don’t get me wrong, there are a lot of things I really love about it, and new ways I’ve found of speeding up my workflow. I’ll get into those a in the next post, but in the meantime, if anyone’s got answers to the above problems, feel free to leave a comment. I’d love a solution or two.