Pelican 1510 Camera Case
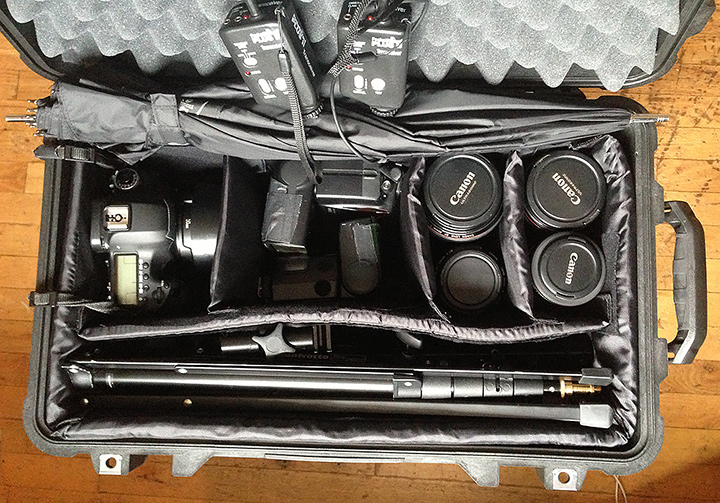
So I gave in an bought myself a Pelican model 1510 rolling case for my camera and such. Everything I’d need for a typical editorial portrait shoot. Packed in there I’ve got:
Canon 5D Mark III Body
28mm/1.8
35mm/1.4L
40mm/2.8
50mm/1.2L
50mm/1.4
85mm/1.2L
Canon 580 EX Speedlight
Nikon SB-80 Speedlight
2 Pocketwizards
2 Manfroto 6′ mini light stands
and I think I can fit two 36″ Softlighters diagonally across the top before I close it, or at least the umbrella parts. This is my first attempt, I’ll get more refined in time. I won’t need to carry all those lenses all the time of course. I just wanted to see how much I could fit.
It’s not light though. Weighs in at just over 30lbs all in. Not bad considering the shear number of options it gives me and it’s very compact size. Let’s just say that I’m glad it’s got wheels.
Speaking of wheels, I’m considering replacing them with softer/quieter rollerblade wheels like this guy did:
UPDATE: I did in fact find replacement wheels on eBay. Here’s a link for as long as it exists. Just look up 60mm x 20mm luggage wheels. I got mine from a place in Hong Kong. $15-20 with shipping and they installed fine and are much quieter.
If you’re going to buy one, do so from this amazon link and I’ll get a few cents to support the site:
Collaboration, It’s Time.
If you follow my work at all, you’ll know that I do a lot of my work alone. Or rather, generally light, cast, concept, shoot, and retouch my own images. To say that I like to have control is an understatement. A shrink might say that I’ve got a bit of a complex about it, and I beginning to think they’re right. What started out as a way to prove to myself that I can do it all, has mutated into a phobia against collaboration, often to the detriment of the growth of my work.
So I’m going to change this. I’m going to start reaching out to the madhouse of talented people in my life in an attempt to make something new which is more than the sum of our skill. To make things I just could not do on my own. The mental hurdles are likely to be even worse than the physical ones, but that’s ok because if you’re not scared, you’re not growing.
I’m not entirely sure why I’m writing a post about this, except to make a public declaration of my intentions so that perhaps you all can hold me to it. Been taxiing for far too long.
So, to all the fashion designers, set designers, make-up artist, illustrator, animator, and other friends of mine. Let’s talk.
What I’ve Learned About Video – Take One
So as some of you have noticed, I’ve started making really short films. Two so far, more to come. More or less weekly. This is a new experiment. As much about getting the creative juices flowing as it is about actually getting into making films. As the couple I’ve done so far were both thrown together in a matter of hours, they’re not perfect, but I’m learning very fast where my failings are.
“Ice Cream Cait” was done in one shot with the camera on a tripod, which made everything pretty easy. In fact, technically, I’m pretty happy with that one. It looked how I wanted it to look. Creamy bokeh (85/1.2 will do that, even at f/3.2) and great actress. The main mistake I made in that one, was the fact that I used an auto-exposure mode, which caused the camera to stop down once Everett comes in at the end to steal the ice cream, which darkened the image. I guess I could have fixed that in post, but again, it’s not about them being perfect at this point, it’s about shipping. I ended up using some Creative Commons music for that first video, which worked out perfect as a ‘porn soundtrack’
On the second film ‘Spring Fling’ I became more ambitious and decided to do one that required editing and a shot list (though it was made up in my head as I went along). This time I ended up having three problems:
1) I did the same thing with autoexposure and have learned my lesson; Manual mode from here on in.
2) Most noticably, I need a stabilizer. The shots where I’m walking behind the actors are way too shaky. I knew this one going in and the uneven slate sidewalk didn’t help. I shouldn’t have handheld. Even if I had put the camera on a tripod and carried that it would have been a lot better. I’ve also figured out a way to use my little tripod as a make-shift stabilizer which works but requires a few feet to the left because 2 of the legs are extended as counterweight. I don’t really want to pay a few hundred bucks for a commercial one at this point, but I’m probably going to try to build one of Johnny Lee’s $14 Poor Man’s Stabilizers. Even if only for fun.
3) White Balance and overall color are tricky. I’m not shooting RAW with the Magic Lantern hack yet (maybe someday Claude) but when you’re moving in and out of shadows and sun the camera is shifting white balance back and forth which can make matching clips tough. I have generally been able to ignore this when shooting stills by just dealing with it in post, but it becomes cumbersome to color correct each shot in a sequence. Probably better to set it to Daylight outside and work all the clips from there. I should also switch my picture mode to something a lot flatter and low contrast so I can grade the look of the image later.
—–
I have not tried anything with dialog yet. That will involve little zoom recorders and lav mics or a shotgun. All stuff I’ll get to in due course, but I wanted to get some of the visual stuff under my belt first.
The other thing I’ve learned is that video is REALLY time consuming. Both in editing and in rendering. I’ve got a really fast top-of-the-line i7 desktop with 32GB of RAM and it still takes 5-10 minutes to render out my 1-2 minute films to h.264 at 1080p. Crazy. I’m sure there’s more to come in the ‘beginner mistakes by Bill’ series, but that’s the point right? That’s how we learn.
The Good and the Bad of Adobe Creative Cloud
 Adobe announced today that there will be no future versions of the Creative Suite. CS6 will be the last one. All future versions of their software suite which includes Photoshop, Illustrator, Indesign, Premiere, Flash, Dreamweaver, Audition, and others, will only be available via subscription to what Adobe calls The Creative Cloud for $49/month. There will be no more boxed copy, no CS7.
As one would expect, there has been some outcry on the interwebs because of this policy change. I completely understand the change from Adobe’s point of view. Not only will it make their software more difficult to pirate, but it will also smooth out their revenue stream so they don’t get big bumps when a new version comes down, instead they get a little all the time. It also ensures that all the paying customers (and shouldn’t that be all of them in their mind?) have the latest and greatest version running. The end of compatibility problems. Just like Apple with the iPad, there is no Photoshop CS7, there is only Photoshop CC and you’ll have the latest.
Unless you are a student, or acted like you were one, Adobe software has always been expensive, the top end ‘Master Collection’ costs over two grand. So is $600 a year to get access to all of it really that much worse? For professionals who are buying the software every year anyway, then no. In many ways is makes it easier. Much like buying your apps on the Mac App store makes it easier to reinstall your software on a new machine. For them $600 to have access to all those apps is the cost of doing business, already baked in. I pay about $150 for each annual version of Lightroom alone (now included in the Creative Cloud). I could argue that I certainly use Photoshop and a few of the other apps enough to justify $1.65 a day. I spend more than that on egg sandwiches. And the apps are still best of breed and remain up to date. As a bonus, Adobe is trying to smooth over their customers by offering the first year for $29/mo for current Creative Suite users. There is also a $20/mo for students and teachers.
The real people who are going to lose our are the hobbyists. The serious amateur photographer who likes to buy Photoshop for $600 and then use it for 6 years on their G5 tower. Or the gal who uses only Photoshop. Now they’ll have to pony up and pay the $20/mo for the single app (you can buy them one at a time if you only use one or two). So $240 per year for Photoshop, which is more than the $199 every 18 months that current upgrades cost.
Personally as someone who has been around computers for 30 years, I don’t like the idea of software as a service. There’s something unsettling about it. I like buying a piece of software and knowing that I can install it and use it for years without paying the company another cent. It’s ‘mine’ even though I know it’s only a license.
I’ll admit that when I first read the news I had that ‘ut oh’ sinking feeling. However it’s a brave new world and I don’t think any amount of grumbling and shaking of fists is going to turn back the hands of time. Maybe I can use my current status as an SVA Thesis Advisor to sign up for the discount…
Monitors for Photography – A Primer
 When it comes to digital photography many people will spend thousands of dollars to acquire just the right piece of gear. The right camera, the right lens, that last bit of something that they think will take their images to the next level. Ignoring the fact that your camera is rarely the limiting factor in anything, these same people often forget the one piece of equipment that is arguably even more important, their computer monitor.
Think about it, once you get home with the pictures you’ve taken, you copy them over to your computer and then start making decisions. Exposure, contrast, color, you know, all the important stuff that determines what your images will look like in their final form. Unfortunately, most people view their monitor as an afterthought even though they’ll spend far more time with their photographs in front of their computer than they did with a camera in their hand. It’s the modern day darkroom and should be treated with the same commiserate reverence. So where do we start?
Modern day monitors are LCD
Let’s get a few things straight. Nowadays everyone is using LCD monitors. I’m sure if you go searching around the internet you’ll find some article written in 2002 by some guy in a basement who refuses to give up his Sony Artisan CRT (in fact here’s one now), but that time has come to a close. Even within the field of LCDs, there are a number of factors to consider.
Size
The first thing people notice about a monitor is its size and resolution. If you’re serious about photography, don’t bother with anything under 24″ (or maybe 22″ if it’s that fancy Eizo 221) at 1920×1080 resolution. Personally, I find even that size cramped and would recommend a 27″ at 2560×1400 or a 30″ at 2560×1600. More pixels means that you get to see more of your images in your library or more of the image you’re currently working on in Photoshop. Plus, who doesn’t want more room for palettes. Some people are fans of dual monitor setup, with either their library grid or palettes on the second screen, but I find the break between the two distracting. I’d much rather have a single larger display than two smaller ones, but that is a matter of personal preference.
Panel Type
Unfortunately for you, not all monitors of the same size and resolution are created equal. There are two main types of LCD, TN (Twisted Nematic) and IPS (In-Plane Switching). They’re two different technologies to control the color of the pixels in the display. I won’t go into the guts of the differences here (that’s what wikipedia is for). What you need to take away are these two basic rules: TN = bad for photography, IPS = good for photography.
Now there are certainly exceptions to this, but as this is a primer and not a book, just trust me on this. IPS displays are far less washed out when you’re looking at the screen from an angle, they also tend to be more true and accurate when it comes to color reproduction. They also tend to use IPS panels in displays with better backlighting and fancy calibration tools. So if you’re serious about this stuff, invest in an a good IPS display. IPS panels also tend to have much larger color gamut (that is, they can display a larger range of colors). Some even come close to covering the whole AdobeRGB color space, which is pretty huge.
This is probably a good time to point out that almost all laptop screens up until recently were TN panels. Both because they were cheaper and because they don’t require as bright or power hungry backlight. Exceptions to this are the new Apple Retina Macbook Pros, the Thinkpad x220, and a few Acer models that I’ve seen. This is all to say that if you’ve only ever edited your pictures on a 4 year old white Macbook with an unprofiled screen, then you really have no idea what your pictures actually look like. Imagine trying to color correct while wearing rose-colored sunglasses. Speaking of calibration…
Calibration and Profiling
Whatever monitor you end up getting, it will likely not be very accurate out of the box. At the very least get yourself one of those puck kits like a Color Munki or i1 Display Pro. Here’s how they work: The software displays a series of color patches on the screen while the colorimeter or ‘puck’ sits on the screen and measures the color. Since the computer now knows both what color was supposed to display and what color DID display, it can create a curve to compensate for the error. It creates what’s called an ICC profile which is just a file that the operating system uses to translate and ensure that what the computer is asking for gets shown on the screen accurately. This is the bare minimum when it comes to color accuracy.
The next step up are monitors with what are called Internal LUTs which stands for Look Up Tables. Basically it does a similar translation as the ICC profiles, but it does it in the monitor itself at a much higher degree of accuracy and independent of the computer it’s connected to. All of this is a good thing. Monitors with internal LUTs tend to be much more expensive, heavy, and geared toward pros, but man are they worth it if you can afford it.
The Future
Part of the problem with buying an expensive monitor is the worry that what you buy will be obsolete within a year or two. Good LCDs have been consistant for the past few years, the latest models just minor upgrades from the previous, but there are some things on the horizon. Top level screens still tend to use CFL backlights, that is, old-school florescent bulbs. Many cheaper screens now use LED backlights which tend to be more consistant over their life-time, use a lot less power, lead to thinner screens, and turn on almost instantaneously as there is no warm up period. For some reason however the high-end screens still use CFL. I’m sure there’s a good technical reason relating to color gamut, but keep an eye out for that.
Update 1/7/14: A number of high-end screens have started to be released with LED backlights. The new NEC PA302W for instance has a tricolor LED backlight system which still allows for wide color gamut.
Another thing that’s coming down the line is 10bit per channel color. More bits means less dithering between colors in gradients and such. Some screens can do this today via displayport, but only a few high-end workstation video cards will output 10bit, and as far as I have found in my research, only on Windows at the moment. Personally I’d love to have it, but I’m not going to spend $1000 on a workstation graphics card that’s slower than a $200 gaming card just to get it. They should really enable 10bit color channels on all video cards at this point.
Then there is resolution. 30″ displays have been at 2560×1600 since the Apple 30″ Cinema Display came out in 2004. With all this High-DPI ‘retina’ screen talk on mobile and laptop devices, it’s only a matter of time until desktop screens fly up to higher resolution. 4096px or 4k most likely. Whether this will happen in the next year or two is anyone’s guess. I have heard that making panels at 30″ with that many pixels is still really difficult. The manufacturers are getting very low yields (the percentage of screens that are defect free) at the moment. But again, only a matter of time.
Update 1/7/14: Hallelujah! The 4K revolution has begun! A couple of months after I originally wrote this post, Asus came out with a 32″ LED backlit display with a 3840 x 2160 resolution. It cost $3500 and the color accuracy wasn’t great, but it was a first step. Then in last December, Dell started shipping it’s own 32″ 4K for $3500 as well as a 24″ version for $1300. Both were part of Dell’s PremierColor line which means they come calibrated from the factory to have a Delta-E of less than 2. Pretty good straight out of the box. I bought one of these 24 Dell UP2414Q displays and have used it to replace my aging NEC 3090, though not without some trouble. Getting this may pixels from your computer to the display is still a little bit of a black art and not for the faintest of hearts. I’m sure all the kinks will be out in the next few months. In the meantime this is on the cutting edge, so be prepared to cut yourself.
Advice
So let’s say that you’ve been listening all this time and are interesting in upping your game. Here are a few recommendations. One thing to keep in mind is that while there are screens from 50 different manufacturers, the actual panels inside them are only made by a handful of companies. LG and Samsung alone hold over half of the total LCD panel marketshare. The differences between manufacturers and models are in the backlight systems, input circuitry, etc. Imagine the same engine in a VW Jetta and an Audi A4 Quattro. Same motor, very different car.
If you have a decent screen and can’t spend any money at all, but find that the prints coming out of your printer are way too dark, then your screen’s brightness is too high. Pull that brightness down and you’ll be more accurate, save yourself some money on electricity, and save your eyesight.
If you’ve got a decent screen and are not getting great results out of the box, buy yourself a colorimeter kit and profile that puppy up. This is bare minimum if you’re serious about seeing your images as they actually are. I’m personally a fan of the xRite products like these:
If you’re coming from nothing and want to spend less than $1000, get yourself a quality IPS screen and a decent profile system. A lot of people really like the Dell Ultrasharp series of monitors. The main problem with Dell monitors seems to be that they’re WAY too bright when they come from the factory, but once you pull the brightness down they tune right up. These links are from Amazon, but keep an eye out for big sales at Dell.com. Be sure to profile with a colorimeter like the the ones listed above.
Some Cupertino diehards are going to demand an Apple Display. That’s too bad, because while they’re very pretty, they’re overpriced for the performance they deliver. Same panel as the Dell above for almost twice the cost, and that’s before Dell’s frequent sales. Also, many people dislike glossy displays. While blacks can tend to look more black and things are arguably a bit sharper, reflections can be a really serious problem and make it difficult at times to judge what’s really there on the screen. Again, be sure to profile with a colorimeter like the the ones listed above.
If you’re really serious and want to buy the monitor that’ll last you for years there are really only two choices. NEC or Eizo. Eizo are more expensive and cooler looking, but quality for quality they’re both in the same ballpark. These three monitors include their own calibration systems.
And if you want to play with fire, you could try one of the new generation of 4K displays. Remember that you’ll need a graphics adapter with DisplayPort 1.2 and it software support is still a bit spotty. For instance, Mac OS 10.9.1 doesn’t yet allow for MST mode which gives you 60Hz refresh rate at it’s highest resolution, and you need to run a terminal command to enable HiDPI mode. Again, be warned, but the images and text do look just lovely.
Dell UltraSharp 24 Ultra HD Monitor UP2414Q
Dell UltraSharp 31.5 Ultra HD Monitor UP3214Q
Conclusion
Now some people will say, “What? You must be out of your damn mind if you think I’m going to spend $1000+ on my monitor!” Well that’s just fine, but think about how much you’ve spent on your camera? How about lenses? Or your computer? My $2000 30″ NEC that I bought 5 years ago saw the coming and going of 4 camera bodies which cost about $12,000. Think of it as an investment in a great pair of glasses that let you read accurately and without strain. I’ve never heard of someone having buyers remorse after upgrading their screen.
CamRanger Review
 The promise of technology is that it makes our lives easier and new things possible. Both of these things are true of the CamRanger, a wireless DSLR remote control tether for iPad and iPhone.
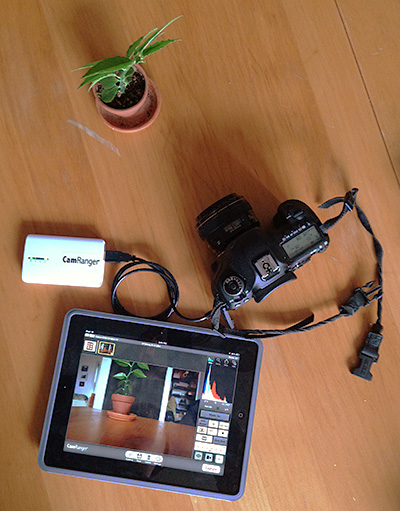
With the CamRanger, you can remotely control your Canon or Nikon DSLR as if it were in your hands. At its heart, it’s a mobile wifi hotspot with custom firmware, but it’s that firmware which makes all kinds of exciting things possible. Once you’ve got the free sister app installed on your iOS device, you can fire the shutter, change settings like shutter speed/aperture/iso/mode/etc., all from a great distance away from your camera. Not only that, but you can use live view to see what the camera sees and even tap on the live view image to focus, just like it was the camera on your phone!
What’s happening here is that the pack of cards-sized CanRanger box plugs into your camera via USB. You then connect your iOS device to the CamRanger’s own WiFi Network. The network is protected by a password printed on the back of the unit. Personally, I think it could do without this feature, or just use the password ‘camranger’ or something. I can’t imagine too many situations where people are going to be trying to hack into your camera, but maybe I’m too trusting. Once the network is set up, just open the app on your phone and it takes control of the camera. In the past I’ve used both the Canon software and Lightroom to tether my camera, and I’ve always had a hard time getting it connected without locking up (both my 5D2, 5D3, and 1Ds3). It typically takes a few tries. I’ve had none of these problems with the CamRanger. Somehow it’s a more solid connection than Canon’s own software.
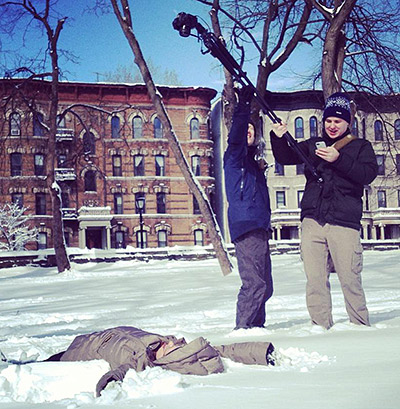 So why would you want this? Well, I can think of a few scenarios. You can use it in a ‘client’ mode, so that as you snap away on your camera the pictures you take show up on the screen for immediate client review (personally my nightmare situation, but I know people who do it). If you are a landscape photographer, you could control the camera from the superior screen of your retina iPad to compose the shot, zoom in and check focus, and review. Personally, it doesn’t do much for me as a one-on-one portrait photographer, but it was VERY handy when I recently shot a bunch of my friends making snow angels in Prospect Park. I had the camera at the end of an extended tripod, cantilevered over the subjects with a wide-angle lens. Using the CamRanger (taped the the legs of the tripod), I was able to compose and shoot using live view from my iPhone. It worked perfectly and I’ll have to admit, it was pretty cool. Additionally, the software shows you a live histogram, has a built-in intervalometer, and will even program HDR image sequences when the camera is in Manual mode. The CamRanger does everything you could expect of it and does it well.
That’s a lot of ‘pros’, so what about the ‘cons’? I can only think of a few. First, it has its own battery, so that is yet another thing to remember to charge. I know this is somewhat unfair because the thing has to power itself, but it did cross my mind. I never had the battery run out while I was using it, and my guess is that it lasts awhile, hours at least. Second, and more importantly is that there’s nowhere to put it when it’s connected. You’ve got this little box pig-tailed off your camera. I would suggest that they create a hotshoe mount for it, but then how would you trigger strobes? You might be able to figure out a way to mount it on the tripod socket, but sitting your camera down on top of an expensive plastic box doesn’t sound like a good idea. So that’s another problem. Next, there is the subject of cost: $299. Not crazy expensive, and if it fills a need you have, it’s downright reasonable. That said, it’s not at the price point where you’d buy it to have around just in case you need it. Lastly, the app, while fairly responsive and easy to understand, could benefit from a makeover by a talented designer. Right now it looks like it was designed by engineers (no offense to engineers), which is fine by me, but generally folks like slick-looking things.
So to wrap up, the CamRanger is a wonderful little piece of tech. While it isn’t cheap, it delivers as promised with little hassle once you get your head wrapped around how to get all the pieces talking to each other. For those of you out there who need to remote control your camera, I highly suggest you consider adding this to your kit.
Note: Dave at CamRanger was nice enough to send me a loaner unit to review.
All Pixels Are Not Created Equal
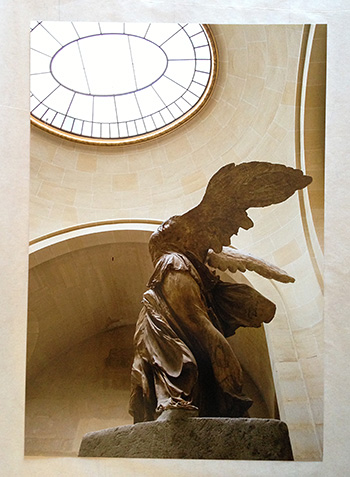 Last night I printed an image I took of the Winged Victory of Samothrace statue at The Louvre in Paris. A nice 13×19″ print on my favorite Red River Ultra Pro Satin paper. It came out beautifully. Honestly I was impressed how well it came out considering the size of the file. You see, I took the picture early 2006 with a Canon 20D and a 17-40/4L zoom that I used to own before I got crazy about primes. Nice piece of glass and good camera for it’s day, but certainly nothing like the resolving quality of my current 5D Mark III.
The 20D is an 8MP cropped sensor camera which spits out a file of 2336×3504 pixels. Approximately the same number of pixels as my current iPhone 5 camera does. And there is a tendency for people to equate the two. Megapixels are megapixels? Right?
Wrong. Megapixels are not megapixels. I once printed out a photograph from my iPhone 4. It was a shot of the inside of the Capitol dome in Washington. The camera had everything going for it. The light was adequate, I held steady. It’s as nice of a file as I’ve seen from a phone. And it printed a nice 8×10″ print. Not an AMAZING print, but something you could certainly frame and put on your wall as long as you didn’t look at it from a couple inches away. Because at that distance, as it does at 100% on screen, it shows it flaws. It’s got that ‘digital’ look of early digital cameras. And the whole thing has the slightly smeary glaze of overzealous noise reduction, and details aren’t really that sharp anyhow. And why would we expect them to be? Physics is physics. A lens and sensor the size of a pencil eraser is not going to resolve as well as one 10 times the size. Megapixels may not be megapixels, but photons ARE photons. Computing power can pick up some of the slack, but at the end of the day, size does matter.
How much it matters is up to you. One could say that the 24x36mm full frame sensor in my 5D is not big enough. That the same amount of pixels in a medium format camera would resolve more. They might be right. In fact that are right, but since medium format cameras tend to use CCD sensors and no AA filters gives it something of an apples to oranges comparison. Huge sensors make beautiful images, but at a monetary and handling cost that I’m not prepared to pay except in specific circumstances.
This is all to say that had I taken the photograph above on my iPhone, there’s no way in hell it would look that good as a 13×19″ print. 8MP or not.
Oh and one more thing, The 17mm lens I was using with the cropped sensor gives almost exactly the same field-of-view as my trusty 28mm prime does on my full frame body. Apparently I liked that look even back then.
Frame Your Photographs the Right Way
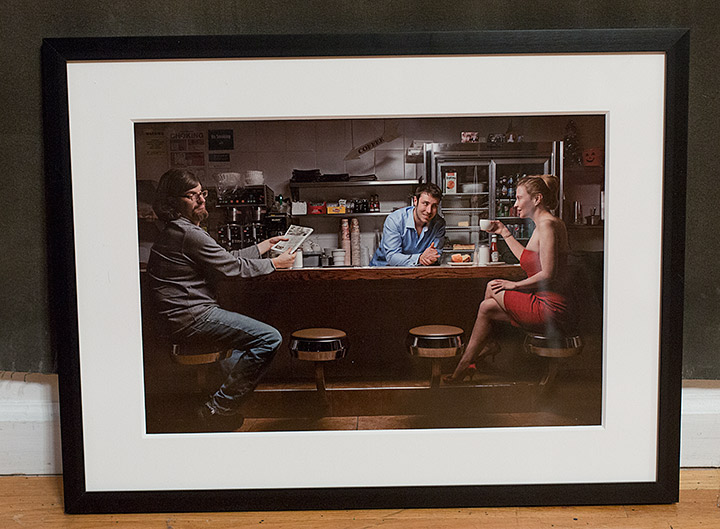
I shot the photograph above about 2 years ago at the beginning of 2011 in the diner up the street from me. It feature the actual proprietor Nick, hitting on a a beautiful woman in a red dress played by my lovely partner Heather. And of course, my friend Claude looks on in disgust from the other end of the counter. I had been meaning to bring Nick a print to put on the wall ever since I shot the picture, but it just kept getting pushed down my to-do list. So I finally printed out an 13×19″ print on my favorite Red River Ultra Pro Satin paper and then promptly let the whole thing go back to the back burner again for a week when I realized that I’d have to order a frame. However, I just remembered that I already HAD a frame I could use.
A few months ago when we were doing some promotional work together for the podcast, Frame Destination sent me an sample of what they could and I had it in my closet waiting to decide on a print that was worthy of it’s loveliness. So I said, ‘screw it’ and decided to use the frame for the diner print I was giving to Nick.
Frame Destination will custom cut frames of almost any size from very high-quality materials. Basically it’s the same or better quality than you’d get at your professional local framer, but for a fraction of the cost. Really top-notch product. I’ve used them to frame my Drabbles show at SoHo Photo a few years ago, and it saved me a bundle. The catch is that you’ve got to mount the print in the frame yourself. Static electricity and dust can be a real nightmare at times, but nothing a reader of this site can’t handle. It was also the first time I had used the non-glare plexi instead of glass it I have to admit that it looks beautiful.
For those who are wondering, here’s the parts list for the above frame:
Nielsen Profile 97 – Matte Black 21 (Anodized) – 18×24
Plexiglas® Non-Glare Acrylic 1/10” – 18×24
Alpharag 8-Ply – White 8660 – 13×19(18×24)
Foamboard Acid Free Artcare 3/16 inch – 18×24
So take this a reminder to print, mount, and hang some of your work so other people can enjoy it for years. If you decide to place and order with Frame Destination, try using the coupon code OTP at checkout and I think you might still get a few bucks off… It’s certainly worth a try.
Emily

Graphics Cards and Photoshop CS6 on Hackintosh
As most of my readers know, I use a Hackintosh as my main workstation. That means that I build my own computer from parts (motherboard, cpu, ram, power supply, drives, etc) and then use a bit of magic from www.tonymacx86.com to make it run the latest version of Mac OS. Which currently is 10.8 Mountain Lion.
Early last year I built a new and very fast machine based on the top-of-the-line Intel 3770K CPU, 32GB of RAM, 240GB Intel 520 SSD and the rest of it. State of the art and very fast. The only part of the machine that I kept from my old box was the Radeon 5770 video card. At the time running Snow Leopard and Lion this card worked just fine. Especially for what I need it to do. Mostly 2D work in Lightroom and Photoshop. And it should work well since it’s the the stock card (STILL!) in the Apple Mac Pro.
For some reason though, the combination of my new computer, old GPU, Mountain Lion, and Adobe CS6 Suite just doesn’t work all that well. If I leave on all of the GPU acceleration in the Performance tab of the PhotoShop Preferences, I get weird effects. The mouse lags a little bit behind my Wacom tablet cursor for example. And using things like a fairly small healing brush lock-up the computer for a quarter second with each stroke. Little weird things like that. Certainly not the kind of stuff that should be happening with a computer at this level.
I found that if I turned the acceleration down to ‘Basic’ that performance got smoother, but then I was losing some of the functionality inherent with Adobe’s inclusion of GPU acceleration in the first place. Needless to say, a little frustrating. After a bunch of setting changes and reboots, I’ve narrowed the problem down to the 5770 card. Not sure exactly what the problem is, but I’m not going to spend any more time fighting it. Time to move on.
So I started doing a little research into possible options. Apparently Apple as moved to Nvidia GPUs in their latest generation of machines, which is great because then there are native drivers for almost all of the latest 6xx series of cards. The move to Nvidia also means that I’d be able to enable CUDA acceleration in Premiere CS6 as well. Which apparently has drastic speed benefits in render times and such. TonyMac even has a list of natively compatible cards here on his site.
The problem is price. The card I had been looking at for the last month was the GTX 660ti. It’s basically the GTX 670 with one of the cores turned off. 88% of the performance for 75% of the price of the 670. The problem is that it’s still $300, and that’s a LITTLE too much for me to spend on a video card. Especially since I do little video editing and zero 3D gaming.
So I spent a few minutes this morning doing some extra research and found this page on Puget System’s site. Now Puget builds custom Windows workstations for higher-end clients and I trust their opinions. Basically they ran some Photoshop benchmarks with a bunch of modern GPUs and the results came out that the far cheaper GTX 650 gives me almost all of the performance of the high-end cards for what I use it for. And for only $120. SOLD.
The thing is that Puget was running the benchmarks in Windows and I’ll be using it in Mac OS, but I think that the underlying OpenGL code in the Adobe products is likely very similar, so I’m hoping that I just made out like a bandit. By the way, I ended up ordering the Gigabyte brand version of the 650 with 1GB of RAM from NewEgg. I love me some NewEgg and I get free shipping from right across the river in NJ with no sales tax.
It should be here on Monday at which point I’ll take the afternoon to do my planned reinstall of the OS and apps with the new card. Will let you all know how it goes.