What I’ve Learned About Video – Take One
So as some of you have noticed, I’ve started making really short films. Two so far, more to come. More or less weekly. This is a new experiment. As much about getting the creative juices flowing as it is about actually getting into making films. As the couple I’ve done so far were both thrown together in a matter of hours, they’re not perfect, but I’m learning very fast where my failings are.
“Ice Cream Cait” was done in one shot with the camera on a tripod, which made everything pretty easy. In fact, technically, I’m pretty happy with that one. It looked how I wanted it to look. Creamy bokeh (85/1.2 will do that, even at f/3.2) and great actress. The main mistake I made in that one, was the fact that I used an auto-exposure mode, which caused the camera to stop down once Everett comes in at the end to steal the ice cream, which darkened the image. I guess I could have fixed that in post, but again, it’s not about them being perfect at this point, it’s about shipping. I ended up using some Creative Commons music for that first video, which worked out perfect as a ‘porn soundtrack’
On the second film ‘Spring Fling’ I became more ambitious and decided to do one that required editing and a shot list (though it was made up in my head as I went along). This time I ended up having three problems:
1) I did the same thing with autoexposure and have learned my lesson; Manual mode from here on in.
2) Most noticably, I need a stabilizer. The shots where I’m walking behind the actors are way too shaky. I knew this one going in and the uneven slate sidewalk didn’t help. I shouldn’t have handheld. Even if I had put the camera on a tripod and carried that it would have been a lot better. I’ve also figured out a way to use my little tripod as a make-shift stabilizer which works but requires a few feet to the left because 2 of the legs are extended as counterweight. I don’t really want to pay a few hundred bucks for a commercial one at this point, but I’m probably going to try to build one of Johnny Lee’s $14 Poor Man’s Stabilizers. Even if only for fun.
3) White Balance and overall color are tricky. I’m not shooting RAW with the Magic Lantern hack yet (maybe someday Claude) but when you’re moving in and out of shadows and sun the camera is shifting white balance back and forth which can make matching clips tough. I have generally been able to ignore this when shooting stills by just dealing with it in post, but it becomes cumbersome to color correct each shot in a sequence. Probably better to set it to Daylight outside and work all the clips from there. I should also switch my picture mode to something a lot flatter and low contrast so I can grade the look of the image later.
—–
I have not tried anything with dialog yet. That will involve little zoom recorders and lav mics or a shotgun. All stuff I’ll get to in due course, but I wanted to get some of the visual stuff under my belt first.
The other thing I’ve learned is that video is REALLY time consuming. Both in editing and in rendering. I’ve got a really fast top-of-the-line i7 desktop with 32GB of RAM and it still takes 5-10 minutes to render out my 1-2 minute films to h.264 at 1080p. Crazy. I’m sure there’s more to come in the ‘beginner mistakes by Bill’ series, but that’s the point right? That’s how we learn.
All Pixels Are Not Created Equal
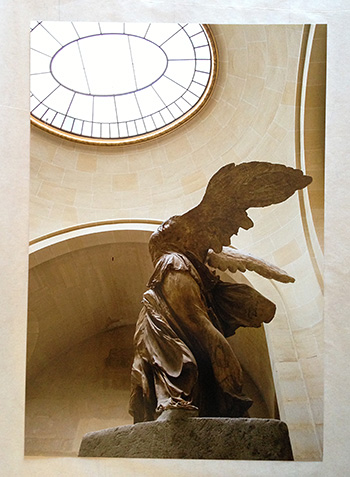 Last night I printed an image I took of the Winged Victory of Samothrace statue at The Louvre in Paris. A nice 13×19″ print on my favorite Red River Ultra Pro Satin paper. It came out beautifully. Honestly I was impressed how well it came out considering the size of the file. You see, I took the picture early 2006 with a Canon 20D and a 17-40/4L zoom that I used to own before I got crazy about primes. Nice piece of glass and good camera for it’s day, but certainly nothing like the resolving quality of my current 5D Mark III.
The 20D is an 8MP cropped sensor camera which spits out a file of 2336×3504 pixels. Approximately the same number of pixels as my current iPhone 5 camera does. And there is a tendency for people to equate the two. Megapixels are megapixels? Right?
Wrong. Megapixels are not megapixels. I once printed out a photograph from my iPhone 4. It was a shot of the inside of the Capitol dome in Washington. The camera had everything going for it. The light was adequate, I held steady. It’s as nice of a file as I’ve seen from a phone. And it printed a nice 8×10″ print. Not an AMAZING print, but something you could certainly frame and put on your wall as long as you didn’t look at it from a couple inches away. Because at that distance, as it does at 100% on screen, it shows it flaws. It’s got that ‘digital’ look of early digital cameras. And the whole thing has the slightly smeary glaze of overzealous noise reduction, and details aren’t really that sharp anyhow. And why would we expect them to be? Physics is physics. A lens and sensor the size of a pencil eraser is not going to resolve as well as one 10 times the size. Megapixels may not be megapixels, but photons ARE photons. Computing power can pick up some of the slack, but at the end of the day, size does matter.
How much it matters is up to you. One could say that the 24x36mm full frame sensor in my 5D is not big enough. That the same amount of pixels in a medium format camera would resolve more. They might be right. In fact that are right, but since medium format cameras tend to use CCD sensors and no AA filters gives it something of an apples to oranges comparison. Huge sensors make beautiful images, but at a monetary and handling cost that I’m not prepared to pay except in specific circumstances.
This is all to say that had I taken the photograph above on my iPhone, there’s no way in hell it would look that good as a 13×19″ print. 8MP or not.
Oh and one more thing, The 17mm lens I was using with the cropped sensor gives almost exactly the same field-of-view as my trusty 28mm prime does on my full frame body. Apparently I liked that look even back then.
Red River Paper – San Gabriel Semigloss Fiber Review
 If you read this site or listen to the On Taking Pictures podcast, you’ll know that I’m a big proponent of printing your photographs. I try to print out a master set of prints for each of my projects. It is expensive to do this and you need some storage space, but it is worth it. There’s something about viewing an image as a physical object which is entirely differentfrom seeing it backlit on a screen. For one, your perception of the print differs just by looking at it without all the light noise of your monitor (or iphone or ipad). Not to mention that the print will still be there when your power goes out for a week during a hurricane (as long as your house didn’t flood). You may also remember that I’m a big fan of Red River Paper. I’ve been using their paper for years now, long before we had them as a friend of the show. In fact, the only paper on my shelf is from their shop. They make excellent products at great prices.
Recently, they released a new paper called San Gabriel Semigloss Fiber. Just from the name I knew it would be interesting, because fiber papers were always under the purview of the darkroom. Traditional fiber paper is an old technology. Basically, a heavy paper with a natural mineral coating (as opposed to a plastic one), though it tends to be little harder to work with. It’s more fragile and picks up dirt easily. It also tends to curl like the dickens when wet. However, it is very archival. High-end darkroom prints, especially black and white, are typically made on fiber-based papers. I typically use more heavily-coated luster papers because I like the saturation of colors and the depth of the blacks that normal matte papers can’t match, but those coated papers don’t ‘feel’ like a traditional darkroom print.
So when I saw that RR announced this San Gabriel stuff, I wrote our friend Drew and asked him to send me a small box to try out. He kindly agreed, and after much anticipation, my paper finally arrived in storm-tossed NYC a couple of days ago.
It’s a thick and somewhat heavy paper, acid-free with no optical brighteners and coated with bartya; just like the old school papers were. It basically looks like a dark room paper without the photosensitive coating, which is just delightful.
Since I’m most interested in using the paper for B&W printing, I pulled out a photograph I took a couple of years ago of the ancient bristle cone pines in the Methuselah Grove (Inyo National Forest, CA).
It’s a scraggly bit of tree in a pile of the rocky stuff they call soil out there. Huge tonal range and perfect for testing purposes. Printed on a sheet of 11×14 from my Epson R3000 printer with no profile (Printer Managed Colors) and the results were amazing. This is the B&W paper I’ve been searching for. Looks just like prints I’ve made in a traditional darkroom.
Here’s a straight macro shot of the printed surface so you can how the ink falls on it. I will say that you can see none of the dots and mottling with your naked eye.

And here’s an edge on macro shot to show the texture of the paper. I’m focused on the tip of the corner of the image.

Finally, a backlit shot to show reflectivity. As you can see it has a little glare, but that’s because it’s coated and not a raw paper. I will say that in person the quality of reflection is really nice and organic if that makes any sense at all. Sort of a waxy sheen.

I’m going to do some more tests, but so far this looks to be my new fine art paper of choice. Well done guys. Be sure to go over to RedRiverPaper.com and get a sample pack or a box to try out. Use the coupon code OTP and you’ll get 10% off your order.
Underneath by Jes Young Book Cover – Behind the Scenes

About a year ago I wrote a post for the cover of the first book in this series entitled “Tab Bennett and the Inbetween”. That cover was a serious composite too, and because I never did get around to writing it up for the blog I thought I’d take the time to let you all behind the curtain for the making of the second one.
I should point out that Underneath, Princess of Twilight & Dawn will be out in the Amazon Kindle book store on December 30. I’ll be sure to update the post and let people know where they can get it.
The author Jes Young and I sat down and talked through some ideas for the second book. Just to get you up to speed in case you haven’t read the first book (which you should, here’s the ebook on amazon), the main character Tab was a young woman whose sister had died and is just learning the truth about who she was, which happened to be an elf princess with a destiny. On the first cover we visualized a scene out of the book where she’s walking from her house toward toward an apparition in the woods at twilight, and starlings are flying around over her head.
For the second, somewhat darker book (think The Empire Strikes Back), Tab is journeying down into an underworld to confront her evil father. We thought that a downward spiral staircase would be a great visual since it is a significant part of the story line. Tab would be dressed a big sexier, be a bit more badass, and be holding a bladed weapon of some kind. I liked the idea of making her pose similar to the first cover, with Tab walking down the steps, but looking back over her shoulder for danger. It would bring some continuity to the series.
The first challenge for this project was to find a spiral staircase. It’s a surprisingly difficult thing to do. But Jes (or course) has a friend who happens to own a castle, Osborn Castle at Cat Rock up on the Hudson to be specific. So in the fall, I took the train up with camera to shoot scenes and elements which I could later mix together for a background plate on which to build the composite. I’d like to take this moment to say that this place is BEAUTIFUL and a special thanks goes out to Fred for being so gracious and letting us use his property.. So if you’re fancy and looking for a place to have your wedding or similar gala party, then Cat Rock should be on your short list. Fred was kind enough to give us a tour of the grounds and the house. When we mentioned staircases, we were told there was one off limits to the public up on the third floor. As it happened, it turned out to be perfect for what we needed. I set up my tripod at the top and took this picture. It’s severely wide-angled (28mm) and I know that the perspective is going to be exaggerated, but I’m ok with that because it will just add to the intensity of the final result.

Pretty boring right? Too bright, cheery, and far too clean for what we needed. That’s ok, I can deal with that in post. The important part is to capture the crazy meandering stairs.
What I needed was a way to grunge it up a bit. Sometimes, taking pictures of uninteresting things can be a real lifesaver, case in point: I had a picture in my library of an old plaster wall whose paint was cracking and flaking off. It looks like this.

I used this detail stretched across the original stair shot in overlay blending mode, which made the two appear to merge into one foreboding stairway into the unknown. Here’s what that looked like.

Simple, right? Well it kind of is. It may not be perfect, but because we’re going to do so much more to this composite before we’re finished, it’s ok for the moment. The next step is to make scene darker and creepier, and make the lighting far more blue than the original shot. In addition, I wanted to sculpt the light a bit to give the impression of a final window with dusk or moonlight coming in from left to right.Jes had also requested that we bring in the birds from the cover of book one, so I added that detail in. That leaves us with this:

Notice that there are some lighter areas in the middle, that’s where I am planning to add the model. Thenext step was to get my friend Mary to model as Tab. I pulled out some blue paper to make it easier to mask her out, set up a couple lights (one for fill and another to mimic the light coming in the window), and set up a box to act as the step for Mary to stand on so that her feet and positioning matched as much as possible.

You can see that I didn’t have a sword for Mary to hold. I couldn’t get it in time, so we had to make due with a small umbrella as mock sword hilt. I was happy with her expression and the angle of her body, but we added some later shots which had much more dynamic hair, so that it would look like she was whipping her head around because she heard something behind her. So-(delete) I looked through the shots and composited the hair from a later shot onto this one. Here’s a crop of the hair shot.

Now it was time to bring Mary into the background. I actually-delete had pretty-delete decent luck using a mask and the built-in refine edges commands in CS6, which surprised me because they have rarely worked for me in the past. So-delete Here’s Mary against the plate, with and without the shadows. Look around her feet on the shot on the left and you’ll see how pasted in it looks. Matching shadows and light are the key to making shots like this work.

The next challenge of course, was the issue of the sword. I had a prop sword which I shot and masked out and placed into the scene, but it didn’t quite jibe. Rather it was fine, but it didn’t have enough pizazz or magic or something. So I gave it a bit of a glow and a little specular/spectrum?? highlight to bring more attention to it. Here’s the before/after:

Much better. The only thing left to do was to add a bit of vignetting to make Mary stand out and make the whole shot look more claustrophobic. I also added the grunge border I used on book one; yet another element of consistency between the two to give them continuity. Oh and last but not least istype/font, again I used the same style I developed for the first book. So, without further ado, the final cover for Underneath by Jes Young looks like this:
Tripods – Polaroid Carbon Fiber Mini-Review


I joked at the beginning of this week’s On Taking Pictures podcast that tripods are for wussies. Obviously I was joking, mostly. To be honest I don’t use a tripod very often. I’ve got a old big aluminum Gitzo that I bought used a few years ago. It’s big and fairly heavy, but that doesn’t really matter because it never really leaves home. Almost exclusively it’s supporting my Cambo 4×5 camera if it’s out of the closet at all. I’m glad I have it, but with smaller cameras I’m more of a handheld, ‘move around with it to my eye’ kind of shooter.
I know there are a lot of people that swear by tripods, people like my friend Gary Yost who called me out on my wussies comment from the show. He uses tripods to great effect when shooting time-lapse and long-exposure kind of work, and I would imagine for that kind of thing a solid tripod would be an absolute requirement.
A few weeks ago while on a job I borrowed a nice tripod off of another photographer. Carbon Manfrotto legs and a Really Right Stuff ball head. It was a beautiful setup as such stuff goes. That head was one of the nicer machined objects I’ve ever seen. But have you guys gone and looked at how much gear like this costs? The RRS ball head alone is $400. Worth is based on the craftsmanship to be sure, but I can’t afford to spend $700-800 on a tripod that I rarely use. I want to play, but I don’t want to pay, that much.
Back in 2004 I went on a trip with my father out west for 15 days. We drove over 4000 miles in a white Impalla rental, through 12 states and 10 National Parks. It was a marathon and I knew I wanted to get a tripod for the trip. So I went and bought a nice Manfrotto pistol grip ball head and a cheap set of aluminum legs by Slik. It was a crazy mismatch of gear as the legs were not and are not up to the challenge. They were light and cheap, I think I spent $90 on them, but they’re shaky and flex in a way that’s undesirable for a tripod. So now Heather and I are taking a trip out to California in a few weeks and I had been thinking that I wanted something a bit more solid, but also light, so that I could quickly set it up on a trail and take a self-portrait of the two of us. Some nice night shots of the stars when visible would be fun as well. My attempt in Utah last year with the camera propped on the back hood of the car wasn’t really up to snuff.
So I went shopping for carbon fiber tripods that are well built and relatively inexpensive because again, I don’t know how much I’ll actually use the thing outside travelling. A search on B&H came up with something odd. Apparently a few years ago, Polaroid of all people had someone OEM them a carbon trip and ball head. The price had come down since their downfall and the latest price was $150 for the 65″ version. That’s a crazy good deal if it’s any good. Reviews on Amazon.com were very favorable and so I took a ride into town to the B&H Superstore and had them get me one from the bowels of wherever they call them up from. It was nice, and felt solid for the price, but for some reason I couldn’t pull the trigger.
Fast forward a few weeks and the trip is quickly approaching, so I took another look on Amazon and one of their ‘market’ sellers had 6 of the Polaroid tripods for $89. Only catch was that it was a 57″ version that I didn’t know existed. The height was enough for me and the price was right so I pounced on the deal. UPS delivered it a couple days ago and low and behold it was the 65″ version I had looked at in the store. Apparently the seller had a typo in their description.
So far I’m very happy with the purchase. It’s light, stiff, and comes with a ball head which I think might be enough for the trip, though I’d consider upgrading to something a bit more solid in the future. Though the camera plate that came with it requires a screwdriver, the plate itself is a knock-off of the Manfrotto quick-release plates I’ve been using for years. The legs have a very Gitzo-esque look to them as well. It’s a knock-off for sure, but a knock-off is fine for me. The only downside that I’ve found so far is that the leg extender clips are plastic and therefore might not last forever, but for $90 with shipping I can hardly complain. Crazy good deal. Now I can say goodbye to those old Slik legs.
Printer Paper Decisions
 Few people actually print their pictures anymore. Personally I find that a sad state of affairs. A couple years ago I was sharing a new project of mine with one of the top portrait photographers in the game and he asked if I had printed them yet. I told him I hadn’t and he reprimanded me pretty swiftly. He said, “Print out a master set. Sign them, date them, put them in a box and put it on your shelf. Those are now the project.”
And he was right, you know. I came home and over the next couple of days I made an 11×14″ print of each of the images and they sit in a box on my shelf as we speak. They’re a physical product of the hundreds of hours of work I put into them. They’re the end result.
Printing at home can be a lot of fun too, but there are numerous decisions along the line which can effect the final product. For the sake of this essay I’m assuming you’ve got yourself access to a nice pigment ink printer so that your prints will have a longevity measured in decades or centuries as opposed to weeks and months. I’m currently using an Epson R3000. It goes up to 13″ wide which is plenty for me and uses larger ink cartridges than the R2880.
The biggest question is what paper you’re going to use. Here are my thoughts.
SURFACES
Glossy
Glossy paper is very modern and in many ways best represents the true photograph. It’s got deep blacks ( and fully saturated colors. The problem is that it’s quite reflective and can sometimes be like looking at an iPad on the beach. I personally don’t use it much. Too shiny for my taste and somehow doesn’t have any character. It’s too clean.
Semi-Gloss
Also known as satin, pearl or luster; semi-gloss papers are coated like glossy papers are, but the surface isn’t smooth. Instead then typically have a textured, almost sandblasted finish which reduces the biggest problems of glossy. Imagine your average textured photo print from the 1970’s. That probably had a satin finish. This is my preferred paper, not only does it have a D-max almost as high as glossy so that blacks and colors pop, the finish also drastically lessens the reflective problem. Best of both worlds.
Matte
Matte papers are uncoated with a smooth finish. Think of them as a think piece of regular paper. A lot of people including my friend Jeffery love matte papers when printing black&white pictures. He says is reminds him of uncoated fiber papers from his darkroom days. I can see that, but when I print the same image on matte and satin and put the two next to each other, I almost always choose the satin. Blacks and color saturation on the uncoated papers are just to subdued to me. It’s like someone turned down the vibrance and pulled up the black level to 25.
‘Fine-Art’
I’ll admit, I don’t get so-called ‘fine-art’ papers. Typically they’re a more more rough, made from cotton rag, and often slightly tinted matte paper with more natural textures. I don’t like the idea that my paper is purposefully changing the image I’m printing on it. If I wanted texture I’ll do it in photoshop. Perhaps the argument is that buyers look at ‘fine-art’ paper and it looks more hand made or unique and therefore worth more money. I’m not sure, but it always looks hokey to me. Like it’s trying too hard.
WEIGHT
A paper’s weight typically denotes it’s thickness and in America is expressed in pounds. For example 68lb stock. Interestingly enough, this is derived from the weight of a ream (500 sheets) of uncut stock used during the manufacturing process.
How thick you like your paper is subjective, but I tend towards the middle. Too light and they’re easy to bend and crease, too tight and they’re hard to roll for shipment and flatten out afterwords. Medium thickness also works well in portfolio pages or stacks of prints for people to flip through.
LONGEVITY
Over the years, people have looked for ways to make paper a brighter color of white. So ‘white’ that they often have a blue tint to them. They do this by adding optical brighteners to the papers. It’s the same stuff they put in laundry detergents to make your clothes colors pop. For longevity sake you should try to use the less brightened paper as a general rule of thumb.
You should also look for acid-free papers if you’re anal about how long your images will be around. This usually limits you to matte and fine-art stock. A good matte paper and pigment inks and your prints will out last you by a long margin.
RECOMENDATIONS
Personally, 90% of the time I print with Red River Ultra Pro Satin. It’s got a great surface and D-max without the too many brighteners which make my eyes hurt. This is what I use to print images I sell. When I do print matte I go for their Polar Matte.
In the spirit of full disclosure, Red River Paper is a sponsor of the On Taking Pictures podcast but I’ve been using their products for years before any of that happened. They sell great paper and great prices. In fact, go to http://redriverpaper.com/otp and you’ll get a great deal on a sample pack and 10% off when you decide to order.
Now go take some images and make some prints that you can pass down to your children’s children.
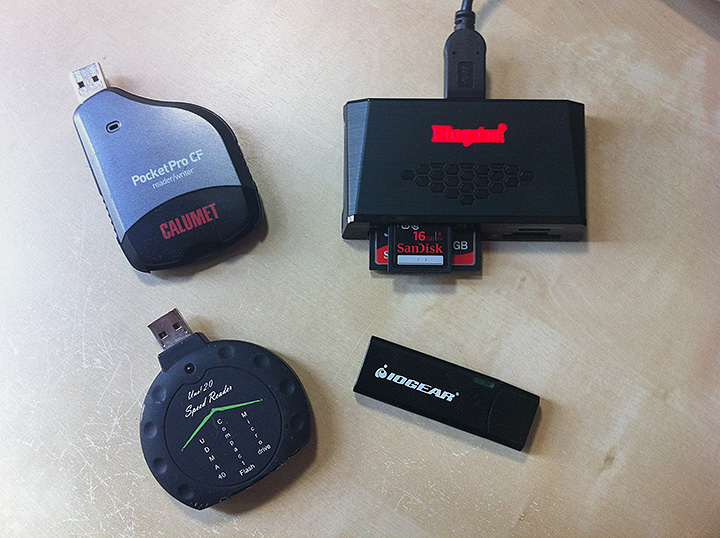
Card Readers
One of the many things that the transition to digital photography has brought us is the ubiquitous card reader. So many types, so many choices. For example, here’s the collection that I’ve been using for a few years:
Of course you could just plug the camera into the computer with the typically included USB cable, but traditionally that has been the less popular solution. Partly because often you’re using the camera with another card while the first card is being downloaded to the computer, but mostly because the USB interfaces on cameras (at least the Canon dSLRs I’ve used) have been pretty dreadfully slow. Even though they’ve been listed as USB2 for a number of years, you’re lucky if you get 8-10MB/s out of them. This is just unacceptable when we’re talking about 16GB cards full of 500 images. Let’s face it, we don’t have all day. I’ve heard that the new Nikon D800 does USB3, but I haven’t found out if it’s any good. The growth of ethernet at the top end is also interesting, hopefully it’ll trickle down on the next revision.
And so, like many of you I’m sure, I’ve collected and shifted around from card reader to card reader over the years. My first serious reader was the Omniflash UNO! (lower left), I know it looks crappy, and it is in many ways, but for a while it was one of the only Ultra-DMA card readers available for anything approaching a reasonable price. The UDMA part means that it was reading pretty close to the maximum speed of USB2 around 30MB/s with the fastest cards. However the best part about these is that they were crazy cheap. And by cheap I mean like $6 each. So cheap that I used to buy them in multiples so I had spares when I broke them and could keep one in every bag. They were great.
However I ran out of good ones one day and didn’t have time to wait for a shipment from China, so in the meantime I went and picked up a new one at Calumet. In fact it’s their name branded PocketPro CF which I’ve been using for the past year or so and honestly it’s been trouble free. However it was over $20 and didn’t do anything the cheap ones didn’t do except last a bit long I guess.
With the purchase of my 5D Mark III and a really great sale at Best Buy one weekend, I switched from the 8GB SanDisk Extreme III CF cards I was using over to a couple 16GB SanDisk Extreme SD cards which top out at 45MB/s. Faster than USB2 can possibly go, and since I had built my nice new Hackintosh with USB3 built in I wanted to give it a go. So I picked up this cheap little IOGear USB3 SD card reader from Newegg. It looks like a USB flash drive to me, and it essentially is, only with a slot on the side that you pop a card into. It’s a little flimsy and I don’t really like the way the card sticks out of the side of it. And for some strange reason, it wouldn’t let me write to the cards from my computer saying they were read-only. In fact, every card I tried said it was read-only. None of them had the write-protect switch flipped (though I tried them in all positions including the middle which some people online suggested), but still nothing. I’ve got the reader built into the Macbook Air for travel situations so I’m not sure this thing will see much use going forward, but we’ll see.
So finally today I got delivered what I hope will be my one main reader for the foreseeable future. It’s a Kingston FCR-HS3 and as you can see in the picture above (upper right), it’s got a hole for just about everything, it’s USB3, and it just heavy enough so that I can have it towards the back edge of my desk under the monitor and it’ll stay out of the way without falling off. I did a little BlackMagic speed test and it read and wrote the SD cards at 42MB/s or better which is about what they’re rated at. Looks like this will be the best of all worlds. I think the only thing I have a problem with at the moment is that the logo has a glaringly bright LED underneath which flashes during disk operations. I’ll probably just cover over most of it with some gaffers tape. That should do the trick.
Ivy Bridge Hackintosh Build Update 2
Last time we spoke a few weeks ago I had my new Hackintosh up and running, but only barely. The hardware was fine, but since Apple didn’t yet support the new chips and features it was a pale shell of the machine it wanted to be. Hacked kernel, no USB3, no power management. Basically, not quite ready for prime time.
Well on Monday, Apple announced their first Ivy Bridge based Macs in the form of the updated portable line. Theoretically, this included all the files the hackintosh community needed to finally get things working for me, but you couldn’t just grab the files off the drive of the new machines, apparently it doesn’t quite work that way. However at about midnight on Monday, Apple released a big 1GB update file for the new Macbook Pro Retina, which included new versions of all the necessary files. You couldn’t just install the update, but people in the forums started pulling things like the new Mach Kernel and power management out and trying to install them to see what happened.
So I decided to throw caution to the wind and did some manual shenanigans to install Lion 10.7.4 with the latest Ivy supporting kernel and some other stuff and it worked well enough that I was about to write a little post giving my step-by-step process, gloating a little, and then recommending that you wait until the TonyMac guys get the final solutions out. Great plan, however while I’m writing, they did just that.
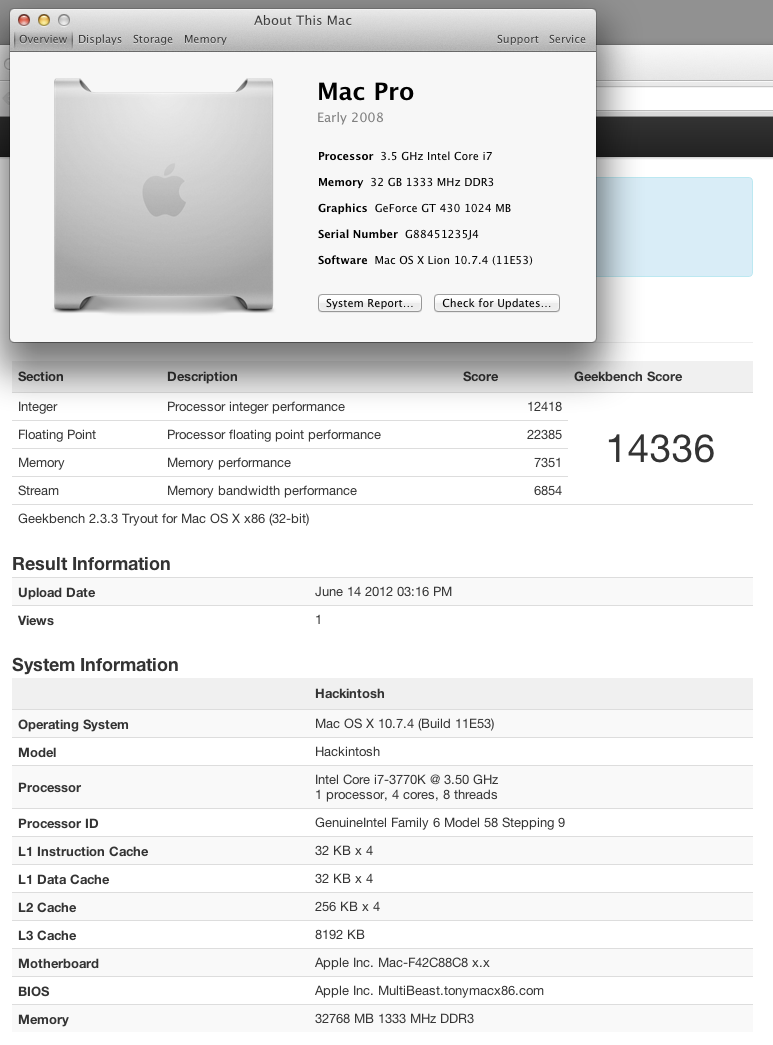
BridgeHelper 5 was just released and gives full ivy bridge support, with power management and USB3. I plugged in my new USB3 drive dock and an ssd just to check and was getting 230MB/s reads (which is about the limit of the old Intel G2 drive I was using to test).
And perhaps best of all, the new machine sleeps and wakes up like baby, but without all the crying. Seriously, it’s nuts fast. Even booting from the Apple logo to login is about 5 seconds. I’m currently overclocking it to about 4GHz, but I’m going to shoot for a bit more as time goes by and I feel more comfortable with it.
The only little problem I’ve got at the moment is that one of my case fans is running at full speed though I’ve asked the EFI to slow it down. I’ve got to look into that, but really, can I complain? Finally got my Ivy Hack up and running. Moved my data drives over a few minutes ago. Let’s see how it feels in daily use. More as I explore but follow me on twitter if you want to keep up, I’ll post and forward more there for little things.
My thoughts on the new Apple hardware at WWDC 2012

Refreshed Airs and MacBook Pros
I’ll admit, I was worried early on in the show. The updates to all of the current laptop models (minus the 17″ MBP which seems to have been 86ed) was underwhelming. Sure, they upgraded the CPUs to Ivy Bridge, which also gave them better GPU and USB3 for free as part of the package. The price on the 13″ Air came down a bit and you can get them with 8GB of RAM which is nice. Same story with the revised MBPs; Ivy Bridge, USB3, faster video card. All were ripe for update, so not a surprise in the joint. If this is all they had to show, that would be a problem.
MacBook Pro with Retina Display
Apple luckily had a trick up their sleeve with the ‘new’ Macbook Pro with Retina Display. There were rumors of a high-dpi macbook. In fact some of the rumors had them across the whole portable line, but apparently Apple is going to take this transition more slowly than some people would have liked.
15″ 2880×1800 screen is the big draw. That’s really high-res. Higher-res in fact than the 30″ NEC I use for my work. Big upgrade, huge. Apparently the screen is crazy thin as well. Overall thickness of the whole laptop is between the old Pros and the Air; so thin in fact that they had to replace the Magsafe connector with the new Magsafe 2 connector. Yes, I know there’s a $10 adapter, but come on, they couldn’t have had the thing be a couple millimeters taller and kept the single standard? YOUR standard? Whatever. That’s Apple being Apple.
2 Thunderbolts but no Ethernet or Firewire. A Pro laptop without an Ethernet port? Oh you can buy a dongle for $30. Great, how about you throw that in the box for free since I’m spending at least $2200 on this thing. Speaking of the price, it’s great as long as you stick with the low-end configuration. However, the second you move up to the faster CPU, which almost everyone who’s in the market for a machine like this is going to do, you’re looking at $2800.
So $2800 isn’t so bad, right? Well, I haven’t spent that much on a laptop since my original Titanium Powerbook, but we’ll put that aside. Apparently, one thing they don’t tell you is that the RAM is soldered onto the motherboard like on the Airs, so it’s not upgradeable. So make sure you get all the memory you need when you buy it. That upgrade is another $200. So now we’re at 3 grand before tax. And don’t forget AppleCare, because otherwise you get the whopping 1 year warranty on that non-upgradeable ‘Pro’ machine you just bought. If you go all in with CPU, RAM, SSD, and AppleCare you’re looking at $4100 pre tax. That’s a lot of bank.
Is it a nice machine? I’m sure it is great, it better be for that kind of coin. And it’s certainly got that screen which no one else at the moment can touch. I should really hold my tongue because I’m not a big fan of laptops overall. I think they’re fine, I’m writing this on a 13″ Air right now, but only because I tend to write better on the couch. For real work, I need a bunch of storage and a bigger screen than 15″, even if those 15 inches are a glorious pixel-packed masterpiece. I’ll admit that when I first heard the specs and saw the pictures I had a little tinge of lust, but then I looked at the pictures The Verge had put up and realized that it’s still just a laptop. Without a big expensive Thunderbolt array and maxed-out specs, it’s not enough to be my only machine, and it’s just a little too big for me to carry without grumbling.
For a photographer who is editing on the road all the time, I think it would be a great solution IF you’re willing to spend that kind of money. For me, it’s not worth it. I know of a couple of wedding shooters who have already placed their orders. Personally, I’m going to stick with my desktop, 32GB of RAM, 8TB of storage, and a big screen. Even if it’s not 221dpi, it’s fine for now.
Updated Mac Pro
Speaking of desktops, they silently updated the Mac Pro as well, though “update” is the extremely kind way of putting it. Basically, they bumped the bottom rung CPU up a notch and rejiggered some of the prices for the dual socket models. No SandyBridge-E Xeon, no USB 3, no Thunderbolt, and still a two year-old 5770 GPU. Honestly, you might as well not have updated it at all. Calling this machine the Mac Pro in 2012 is just embarrassing.
The high-dpi screen on the new laptop also makes the current Cinema Displays look pretty silly at 2560×1440. I’d expect an update to that, too.
Odds and Ends
What’s left? Well, there’s a new Airport Express for $99 which is now dual-band and looks like a white Apple TV. Speaking of which, we heard nothing about the Apple TV- whether the fabled display, an updated box, or an App Store. New iPad case which also covers the back of the device. This one is actually somewhat interesting to me, I’ve looked for a case for my iPad 3, but holding the smart cover on with magnets seemed far too flimsy.
Overall I give it an ‘eh’. Or rather, I gave it a ‘WOW look at that laptop!’ and then I came back to reality before they showed the price, you know, while they were showing the video of Jony Ive pontificating about how ‘nothing ever conceived in the minds of man has ever been this amazing’. Keep using that line, Sir Ive.
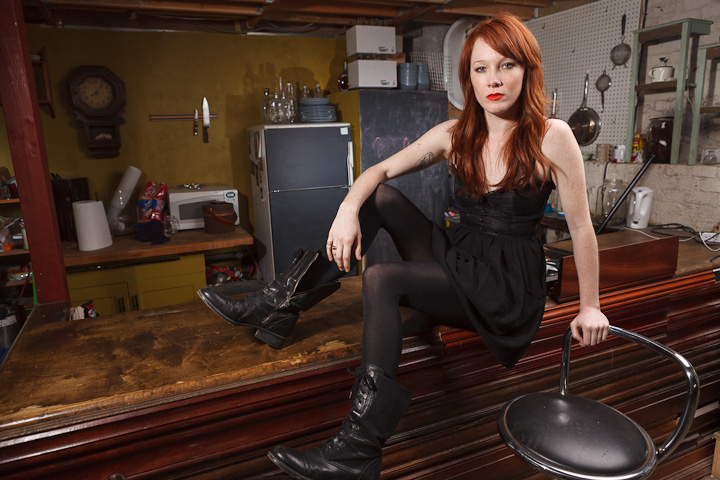
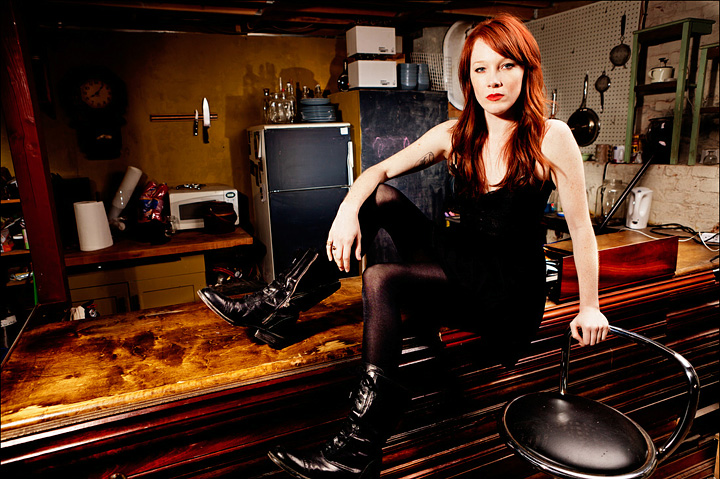
One Raw File, Two Visions
Geoff Greene was one of the photographers at my lighting workshop a couple of weeks ago where he took a picture of our model Mary sitting on the bar in the back of the room. A couple of lights, not a whole lot of set design as you can tell. Anyway, Geoff sent over his version of the image along with some post-processing comments and I thought it would be interesting to show what two different photographers would do with the same RAW image from the camera. So I had his send it along and here are the results.
So here’s the original exported straight from Lightroom:
Then here’s the version Geoff sent me. High-contrast, high saturation, and very ‘fashion’ to my eye:
And finally, what I would have done with it if it were my picture. Not as drastic, closer to the original, but still trying to pull something more out of the RAW data by highlighting Mary a bit. In comparison, mine looks really boring and conservative.
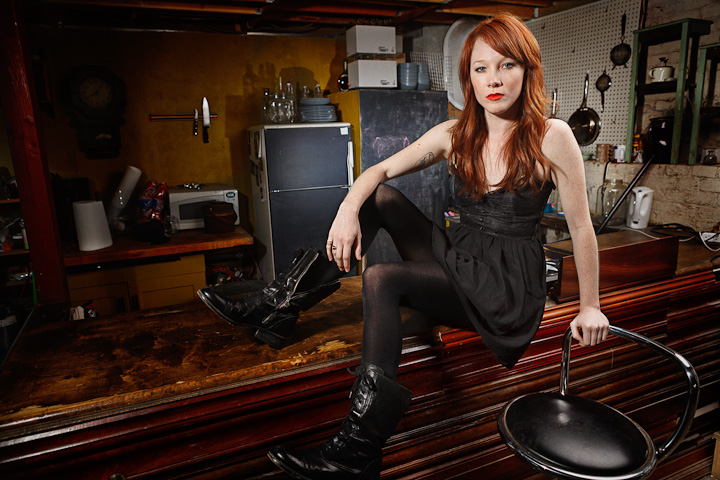
I’m sure if we gave it to 10 photographers we’d get 10 varying versions of the image. Just goes to show how much post-processing is part of the process. We may have gotten rid of the chemicals, but you’re still not done when you press the shutter release.