Setup Notes on the December Portraits (Part 2 of 3)
Here’s the second in a series of posts explaining the how of the December Portrait Series. If you missed the first 10, here’s the post from yesterday. Enjoy.
11:Evergreen

One speedlight with a 36″ shoot-through umbrella camera right. I wanted to do it all in one shot, but with 4 people you often have to composite together the best of each. For this one it was three pics. The men in one and the girls from the other two. The chaos of tree branches actually makes that composite a little more forgiving.


12: Multiplicity

This shot is almost exactly how it looked in the camera so I didn’t even bother showing you the before. We shot in Times Square and during a long exposure (1.5 seconds as I recall) my assistant Dan popped the flash 3 times as I panned Pat’s head across the frame. Not really the kind of picture I’d normally take, but projects like this are for experimentation, so there’s an experiment.
13: Cupcake

Two big soft sources, one on either side of her. Camera actually in the oven on a timer. Was a real pain in the neck to setup after each shot and required a lot of post to bring her our in the picture. Not as successful as it could have been. I realized later that it would have been better if she also had her palms on the glass in panic, or one hand on the window and the other pulling the bottom hem of the apron up to her mouth or other such exaggerated reaction.

14: Newspaperman

Tony Ortega is the Editor of The Village Voice and my idea was to make a homage to Charles Foster Kane complete with snow globe (which I shot and composited in separately). Four speedlights. One with a 12″ softbox above and to the left to act as a keylight on his face. One bracketed to the window frame to the right as a rim light along his back and head. One snooted down aiming at the bar in the back. And one really low power on camera pointed to bounce off the wall behind me for fill and to trigger the rest of the lights with optical slaves.

15: Twisted

The original idea was to do something with refraction through the water in a fishtank, but it didn’t gel, so Craig and I went outside and I shot him walking in both directions in order to composite the top and botton half of him together. Lit by a 46″ umbrella on a Profoto AcuteB


16: Reformation

Neal is a recovering heroin addict who I shot for my drabbles series a few years ago. He is in a better place than he was before and I wanted to play with the idea of baptism and redemption. So I shot him in his bathroom with the crazy shower curtain. Two speedlights, one inside the tub and another handheld above with the diffuser panel down. Then in his hall an artist neighbor had drawn a ghost on the mirror, so I took some pictures and composited Neal into the mirror as if the camera was looking through his eyes.


17: Princess

Lux is the editor of Fleshbot.com and she and I had talked a year ago about taking a picture like this. The original idea was to shoot her from above laying on a pile of writhing bodies, but it’s surprisingly difficult to get that many volunteers and then also next to impossible to get her laying across them with any grace. So instead I used the naked bodies to frame the shot along the edges and made it less raunchy and more glamorous. Two big octabanks, one top right the other bottom left. The subjects were laying down on a slightly satiny curtain I picked up at the corner store on the way. Shot from above in a friends loft which was perfect for the concept.

18: Rescue

Emily, the girl lifting the car, is tiny so I though it would be fun to exaggerate the fact by having her doing something superhuman like lifting a car. I didn’t have access to the car’s jack and it was too cold out to get that involved anyway, so I instead composited a shot of her, one of the car shot at a lower angle so I could make it look lifted, and one of me on the ground as the victim of a horrible accident. The AcuteB shot through an umbrella to soften it was used in all three shots. Also comped in a prettier sunset.


19: Keys

Relatively simple one. Shot Abby outside her apartment door, one speedlight from above with a green gel through a diffuser to match the fluorescent lighting in the hallway.

20: Kick

To have Aga kicking me onto the tracks we shot her in the studio kicking up a storm. Then took some pictures from my chest’s perspective and leg/arms flying forward. Then we headed to the subway and shot the from of the train as well as some pictures of the platform that I could comp together into a space. Lighting in the studio was one strobe with just reflector camera left to mimic the headlight of the oncoming train and another strobe with umbrella above and camera right to fill in shadows and give overall illumination.


Setup Notes on the December Portraits (Part 1 of 3)
A few people have asked me how I pulled off a number of shots from my December Portrait series. It’s my birthday today and therefore I’m in a good mood and have decided to write down some quick notes on each one and perhaps a small ‘before’ shot lest I forget the details. I’ll do 10 a day over the next three days. Let’s get started!
01: Birth

Subjects acting out the birth in the back of their SUV in a parking garage. Megan had the baby at a hospital a few days later, by the way, and both are healthy. 3 speedlights. One coming in the sunroof through a diffuser to mimic the cars interior dome lighting. One on the platform camera right shooting through a crumpled up diffusion panel from a softlighter and one light with an umbrella to the right of James and a reflector to the left just out of shot. In the end I made a composite of the best shot of each of them.

02: Horror

Basement of my sister’s house in Arlington, VA. Friends daughters as the victims, my very accommodating brother-in-law with soot on his face. One speedlight bounced off the wall/ceiling corner camera right as I recall.

03: Bookin’

Gary shot in the studio. Two strobes, one softbox above and in front as well as a second umbrellaed strobe behind the camera at low power to fill in the shadows a little bit. Grain and trees/sunset were separate shots taken in Prospect Park earlier in the day.


04: Theft

Composite of 3 separate shots. One of Heather and the pan shot with one hard strobe with grid and a reflector to fill. Another of Derek climbing in the window with softboxed strobe out on the fire escape and same gridded strobe indoors. Final shot of statue on podium with overhead gridded spot.


05: Mirror

An attempt to play off a painting I saw at the Met. Main shot of girl and mirror was shot with a 48″ octabox camera right facing her back. I then shot the frame in the adjacent room with the same setup shooting through the door to give enough light. Two shots composited.

06: Party

Nothing fancy on this one. Friend’s apartment for dinner and that’s what it looked like. Lindsay put on a party dress, Chris handed her a drink. Lit with a speedlight bounced off the ceiling camera left.

07: Dance

Two shot composite of course. Went to Eran’s house and shot the 7′ tall room from 3.5′ up. Two speedlights in 16″ softboxes a couple feet off the floor aiming at the ceiling. Went back to my place and shot Eran dancing with the same lighting setup coming from above. Marmo was stuck to the ceiling with glue, just kidding.


08: Capcom

I wanted to recreate a scene from the Apollo era. Shot Chris on black background with overhead softbox and an umbrella on either side to give him some rim lighting. Shot smoking cigarette separately and brought it in in post. Headset comped in from archival photograph. Background desks and ceiling build from scratch in Photoshop.


09:Vivisection

Brinkworth and I met up at the lab and shot her with a taped up scalpel and a little fake blood. One speedlight with diffuser panel held up camera right while I was taking the pictures. Later comped in found public domain shot of dissected cadaver arm.

10: Bounce

Shot Cisco on the roof jumping off of a chair. Then brought up a couple of yoga balls which we then moved around and shot in different locations. Composited and colored the balls in post. Added Cisco in bouncing about.


What I Use

A lot of people ask me what gear I own and use. There’s nothing particularly special about my setup. I’m a pretty straight ahead Canon user with mostly nice L glass. All of the pictures I make could be made with similar stuff from other companies, but I figured I’d make a list anyway for those of you who don’t believe me and want what I’ve got.
Each link points to the product on Amazon. So if you plan on purchasing this stuff, please do it through my links so I can buy a can of Coca Cola. Thanks.
Digital
Canon 5D Mark III Body
Lenses
Canon 28mm f/1.8
Canon 35mm f/1.4L
Canon 50mm f/1.2L
Canon 50mm f/1.4
Canon 85mm f/1.2L
Canon 24-105 f/4L Zoom
Computer Gear
NEC 30″ Monitor with Spectraview Calibrator
Wacom Intuos Tablet
Apple 13″ Macbook Air
Kensington Expert Mouse
Western Digital Green 2TB Internal Hard Drives
Software
Adobe Photoshop CS5
Adobe Lightroom 4
Lights
5 in 1 Reflector/Diffuser
Canon 580 EX II Speedlite
Alien Bees B400
Alien Bees B800
White Lightning x3200
Profoto AcuteB Pack and Head
Photek Softighters – all 3 sizes
Avenger A420 Stand with D600 Boom
Film Cameras
Leica M4 with 50mm f/2 Summicron
Hasselblad 500cm
Cambo 45NX 4×5″ Large Format
Preferred Films
Kodak Portra 160, 400, 800 NC
Kodak E100 chome
Fuji Provia
Ilford 3200 b/w
Hot Mess Shoot – Behind the Scenes
Ever try to wrangle 7 pretty young actresses in black dresses? It’s not as easy as you would think, and I’m sure you weren’t thinking it was going to be easy. A couple of weeks ago I wrote a blog post about an upcoming shoot to take the promo shot for season 3 of a web series series run by my friend Amy Kersten which is due out in January. Well, here are the results of that shoot. My friend Claude was nice enough to do some BTS filming so you could get an idea of the scene. Be sure to play it at 720p to see some detail.
For those interested in the technical aspects, I shot with my 5D2 tethered to Lightroom on my new 13″ Air (which worked great by the way, far better than my old unibody Macbook) with a 50mm lens. In the end, I changed the lighting setup I was considering in pre-production and swapped out the ring light for a beauty dish up front. A softbox up a bit on each side were used to get some separation from the background.
This might be a good time to mention something about white, black, and grey seamless paper backgrounds. Under the right conditions any one of these could show up on camera as white, black, grey. It’s all a matter of distance. Distances between the subject and the background and the lights. In my particular situation I would have liked to have more distance between the group of girls and the background, but the laws of physics and the long dimension of my space thwarted my efforts. So in the end what I got was less of a black background than I had intended, which is some ways was a blessing in disguise because it made it easier to cut them out of the background when I decided to do a composite. More on that in a bit.
So I was all set up when they arrived. The best girl ever brought some wine and cheese to feed and relax them while they got ready. All told, that part of the evening was a fine flurry of people. As a general rule I prefer one-on-one shoots, no let me rephrase that. Shoots with one person are a completely different animal than shoots with a number of people. The latter is more an exercise in shepherding than interaction. Or at least it can feel that way, so I had brought along a couple of people to assist me in the endeavor. Once we figured out the best way to group the girls so that we could see all their faces, Cisco spun them up in caution tape and we were ready to get started.
I shot about 150 pictures in total. Not many at all compared to some shoots like this, but ultimately we were looking for one main shot, so as long as I had the raw material to work with, I was good to go.
When we were all through I sent Amy about 50 pictures to look through. The final shot choice was pretty painless, she chose one shot of all 7 and wanted two specific faces replaced from a couple of consecutive shots. Easy stuff because the shots were almost identical anyway. With that bit of trickery done I started on the post production. When we began I had vague ideas of just having them look like they were caught in a police searchlight on a black background. Thus shooting them on black paper as opposed to something on white or similar light color like we used for last year’s pin-up shots. So here is what I started with:

First step was to clean-up any rogue hairs and odd dress straps and misguided makeup. Then I went in and darkened the background a bit to make them pop and used some masked curve adjustment layers to add local contrast.

Not bad, in fact it’s just fine, but it didn’t get me excited. I wouldn’t put this version up as the main image in my portfolio. Too dark, too unfinished. I had to do better. So then I was thinking, ‘what if they were out late one night, had a few too many and were discovered like that in an alley or on the street?’ So I went out and took some images to use as a plate background. There is an empty store a couple blocks away that looked perfect for this concept, so I came home with this:

Yes, it was shot in the daytime, but it was hazy that day so the sun wasn’t harsh coming straight down. In fact there are some advantages, because at night you’ve got the scene lit by a number of different street and store lights, all at different color temperatures with lots of spectrum peaks. Not what you want if you’re looking for a plate that you can mold into your vision. Darkening is easy, and if you do it right you don’t notice that it wasn’t shot at night anyhow. Hollywood does this all the time by the way, when they shoot night scenes in the daytime with the exposure way stopped down. Once you get the background in the ballpark, the next stop is to drop the girls in from the original picture and do a really rough mask just to see if the overall perspective and sizes are right. I took care in shooting the door a bit wider (35mm lens) than the girls themselves, so that the field of view would be bigger and everything would match up more easily. Because I filled the frame i both shots to give me as many pixels as possible, I had to grow the background a bit to make the ladies fit into the background properly. Alternatively, I could have made the girls smaller, but why throw out pixels from the most important part of the shot? The background being a little soft only makes them stand out anyway. In the end the full size image is 4500px square, which is way bigger than it’ll ever be used.

The next step is the tedious part: masking. Ugh. I’ve tried every plugin and technique I can find to do this kind of work. Some of them look like magic in the demos, but at 100% I always find myself going in and working over the final line with a paintbrush anyway, so now I just mask the whole thing manually. In a situation like this where it’s not obvious where a black dress ends and the black paper begins, it’s massively time consuming and headache inducing. But that’s how you make sure it’s done right I guess. There is an advantage to of the kind of work I do, my final product is usually an image or a few images, not 300 like an event photographer would have to churn out. So I take my time until it looks perfect (or at least perfect to me).

With them all masked out like this, you can see that while they’re in the right position and the right size, they feel like they’re floating in the scene, but you still need more layers. That’s because there is nothing connecting them to the background, depth is needed, and shadows are the answer. The first and in my opinion the most important shadows are the smaller sharper ones right where their shoes meet the sidewalk. Adding these alone adds a layer of realism.

Next of course, are the shadows the girls are casting on the background. The main key light up front is going to darken the area right behind the girls. I usually start with a copy of the layer with the girls, move it behind and then fill them with black. Blur and distort it to taste. Then maybe go in with a very soft and light brush to add a little extra shadow where needed.

I got to this point and started to think that maybe I was finished, or very close to it. Then I realized it needed more electricity. For example, where were the side lights coming from? I might as well make them volumetrically visible in the upper corners, and perhaps a lens flare or two to blend it all together. So after a couple hours of shooting and many hours of editing, here’s the final result.

Moving Old Outlook and Outlook Express Email Over to Gmail
I’ve had an email address since 2003 I guess, but I’ve only got the past 4 years or so of my main billwadman.com address up on the google apps server where I host it (I use and highly recommend Google apps standard edition. Now I don’t have to worry about my mail at all when I switch computers). Not that the stuff before my Gmail jump in 2007 was literary gold, but you never know what was in there. Letters from old friends or my dead father, reminders of events that you’ve forgotten about, picture attachments you thought were lost to the sands of time. Old email can be like nostalgia central. Well I was thinking about all of this last night while recording Circuitous Conversations with Dan and it got me thinking that I should take stock in my email archive situation. I didn’t expect for it to take me most of the day, but it did and here’s what I’ve figured out.
Outlook Express
I looked thorough all my old folders of stuff I’ve pulled forward through pc to pc over the years. Back in the late 90’s through 2002 I was using Outlook Express which came installed with Windows. It wasn’t the most powerful piece of software, but it was a lot smaller and faster than the full version of Outlook and I didn’t need calendaring features so it was just fine for me. Those backups were really just a copy of the proprietary .dbx data files as OE kept them. And while they’re not hurting anyone just sitting there, who knows how long I’ll be able to get software that can even read them since they don’t make Outlook Express anymore. I had to figure out a way to get these up onto the gmail servers. In the end I booted up the Win7 virtual machine I’ve got on the hackintosh and installed the most recent version of Windows Live Mail. There is an import function that you point toward your old OE data files and it sucks it in. Step one done.
Now to get it to Gmail. First add your Gmail as an IMAP account in Windows Live Mail. I then created a new folder (shows up in gmail as a label) called ‘OutlookExpress Import’. You can then drag and drop your imported emails over into that folder on the Gmail IMAP and it’ll start copying them up. It’s very slow, like 1 per second in my experience. Something to do with the gmail servers having to parse the data a bit I think.
Outlook
From 2002 until recently I was using Outlook in it’s various versions. So I had a folder with a bunch of archive .pst files in it which was a bit of a pain because I know there are duplicates all over the place within them. So I installed Outlook on the virtual machine and one-by-one imported the .pst files into a nice fresh empty Outlook datafile. Making sure I selected “don’t import duplicates” of course. This took a while. So my about 2GB of my old Outlook archives are now in Outlook and somewhat organized.
There are a number of little utilities out there which will upload your Outlook data straight to Gmail. In fact, Google themselves make one which will do the work for you. I tried using it a couple of years ago to questionable effect. It kept stalling so I decided to take a different route this time. I wanted to get the data out of Outlook and into a form that was more friendly to other systems. So I installed Mozilla Thunderbird, the email sister app to the Firefox browser. Using it’s import system, I pulled all the email over from Outlook. Now that all the mail is in Thunderbird, it means I’m cross-platform (Win, Mac, Linux) , so I pulled all those files over to the Mac and imported them into Mail.app. I’m not a huge fan of the Apple mail program, but I felt like it was a good safe place to make the move to Gmail.
I reckon I could have just added Gmail as an IMAP account to Outlook and done the same thing I did the first time, but I didn’t want to be in the Windows virtual machine any longer than necessary and there was a lot more mail in the Outlook dataset. I could do the same IMAP trick from Mail.app I guess, but I decided to give the latest Google uploader a shot. Windows version here, and Mac version over here. They’re similar in what they do, but somewhat platform specific as to what mail program data files they know how to deal with. And I have to admit, the new version for the Mac is working pretty great so far. I opened it up and it found all the mail in Mail.app and let me specify which of the folders I wanted to send, as well as hot to label the stuff on it’s way up. It also seems to be quite a bit faster than the IMAP route. It’s only about 20% done at the moment so I’ll update this later if I have any trouble, but so far so good.
Wrap Up
So if I had to start from the beginning again I think I’d do things a little bit differently. I probably would have imported the Outlook Express mail straight into Outlook, then pulled in all the archive .pst files. So everything was all in one place. Then spend some time culling the stuff that I know I don’t need from client projects 12 years ago, and perhaps consolidating the folder structure a little bit to tidy things up. Finally I would have either used the Windows version of the Google Uploader and just called it a day.
That said, the alternative of pushing it all through Thunderbird to make it more platform agnostic is not a bad way to go considering then you could zip all those files up and keep them as a standardized backup. Knowing that they’ll be readable for a long time to come since it is open source and uses a variation on the UNIX’y mbox mail file standard. It all depends on how anal you are about such things. But if I’ve learned anything in this process it’s that being a little crazy about organizing things now could save you a lot of time in the future, and perhaps determine if you can even read it at all.
Hot Mess Pre-production
Ok, here’s the situation. My parents went away on a week’s vacation and… Ok, just kidding. What’s really happened is that my friend Amy whom you all saw last week in one of my 365s has asked me once again to take pictures to promote her web series Hot Mess. Last year we shot both individual and group shots in a pin-up style. I was rather happy with the outcome and think they look pretty good as a series.
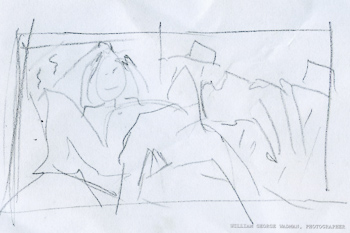
This year we’re going to do just a group shot, however she’s added more characters, so instead of the 4 from last year there are a total of 7 ‘messes’. We’ll be shooting here are my place which does give some logistical problems (it’s not that big) but I think we’ll manage. The concept Amy came with is to take all 7 girls in black dresses and wrap them together in caution tape. In fact she’s even sent me a sketch of what she means:

Ok, so I know we’re stacking them together like that. How it’ll actually work when they’re all here, I guess we’ll find out tonight. I am concerned with how I’m going to make sure they don’t all block each other’s light and what I end up with is half the scene in shadow. So that’s a problem.
I’ve also got to figure out what we’re trying to say with the lighting. I mean, I could easily shoot them on white again and do a similar pin-up motif as last year. It would work and maybe we’ll end up trying it, but I don’t want to rehash the same thing.
So maybe we go the other way and shoot on gray or black and light it so it looks like they’re getting caught by a police searchlight. Maybe even shoot on the paper, but turn it into a composite so they’re in front of a big brick wall or gated up storefront or similar city scene. It’s not a bad idea, now I’ve just got to figure out the lighting plan. Here’s where I plan to start.

So, 9′ seamless with a softbox over both rear top corners to give an edge to as much as possible. This should make it more cinematic and allow them to pop out a bit from the background This should also help if I end up doing a composite. Nice contrasty absolute edges make everything easier.
For a mainlight, I’m thinking about using my ringlight which I rarely use. Most of the time I find it far too powerful for the distances that I work from, and don’t really like the tell-tale edge shadows it produces. However I used it to good effect on the Atari picture of Heather a few weeks ago so maybe it’ll work here. Plus the rear boxes may do a bit to negate those pesky shadows in the first place and I’m planning on backing up and shooting with a longer lens this time as well. As a second option, I could also just setup a bare strobe right above them camera which would probably work as well. One additional advantage of the ring is that if the camera can see it, it’ll be lit. Which helps my fear of them blocking each other’s light if I have it coming from either side.
I’m going to spend an hour or so setting all this up in a bit. Will let you know how it shakes out in a bit.
New to Mac OS – Part 1 Things That Drive Me Nuts
 As most of you who read my blog know, I just recently moved to Mac OS 10.6 as my primary OS. Part of this was just an experiment, part of it is interoperability with Mac OS formated disks from other people which I need to use, and part of it was the fun of getting my Hackintosh to work (I’ve had a unibody Macbook for years as well but that’s not up to what I need to do photographically). That said, I’m pretty happy overall. There are still a few things that drive me nuts. Thought you might get a kick out of my misery.
Things that drive me nuts about Mac OS:
– In Windows I loved that I could maximize my windows to use all the screen real estate and still jump between them because the taskbar is always down the bottom of the screen. I know there is a full screen mode on a lot of apps, but most of the time I just want to click a button and not be seeing all the other crap on the desktop. If you’ve got Photoshop and Dreamweaver and a browser open, you end up clicking on the wrong thing and switching applications when you didn’t mean to. Miss the edge of the window when you click to resize and POOF all your toolbars are gone and you’re in Finder somehow. The green window button makes things bigger, but seems pretty unpredictable as to what it’s going to do exactly.
– Hide vs Minimize. Two ways to get rid of a window. You can minimize it to the dock but to get it back you’ve got to click it’s little icon down on the right side of the dock (and you wouldn’t notice it if you hide your dock). Clicking on the related application icon in the dock doesn’t bring the minimized window back up, you have to explicitly do it. The other option is to hide the app (command + H) which makes is disappear and clicking the app icon DOES bring the window back. Oh and minimized stuff shows up in Expose, hidden apps do not. So you have to know that you’ve hidden the window, otherwise they’re in the ether. Weird stuff.
– In Photoshop CS5 on windows, you can be in full screen mode and still have your image windows as tabs. I have yet to figure out how to do that on the Mac. So jumping between images is a matter of using the Windows menu.
– Icons don’t reflow to fill available space if you resize a Finder window. I know this is an old Mac thing and I understand how this could be useful if you like to layout your icons in a certain way to help remember spatially what is what. But it’s annoying when you just want to see more in the window.
– Resizing from on the bottom left corner. Why not let me resize from any side of the window I want. Annoying. This one has been around forever and is apparently changing in Lion. Long overdue.
– In Finder you can’t cut and paste files to move them. You’ve got to copy them and then delete the originals. Oh and the copying versus moving sometimes gets me mixed up on when it does which and what keyboard modifier key I need to use.
– The whole keeping applications open even when no windows exist is a hard thing to get used to too. I guess when you’ve got 12GB of RAM you can let Text Edit stay in memory, but it’s still annoying that I just opened up a .txt file to copy a chuck of text and then I’ve got to go manually quit out of the application instead of just closing the window. That’s a paradigm shift I guess.
————-
That’s all I can think of at the moment, I’m sure there are more.
Don’t get me wrong, there are a lot of things I really love about it, and new ways I’ve found of speeding up my workflow. I’ll get into those a in the next post, but in the meantime, if anyone’s got answers to the above problems, feel free to leave a comment. I’d love a solution or two.
Photo Computer Buyer’s Guide Part 3 – The Hackintosh Option
 Let’s say you’ve read Part 1 and Part 2 of my Photo Computer Buyer’s Guide with all the attention of Ken Jennings in Double Jeopardy, but you feel like your needs have slipped through the cracks. The laptops and iMac are all well and good, but you really want the expandability of a Mac Pro with a really great screen but you don’t want to spend $5000 to get it. Well if you really want to run Mac OS X you’re not afraid to get your hands dirty there’s always a Hackintosh.
We need to back up one second. In the old days (read, from the mid 1990’s til 2006) Apple computers ran on PowerPC processors. This is a different platform than the Intel x86 machines that Windows has ran on since it’s inception. Apple used to make a big stink out of this fact and laud the PowerPC-based processors as being faster than relavant x86 ones. This was dubious at the time, but by the mid 2000’s, Intel had taken their architecture to levels of performance that IBM (the maker of most of Apple’s fastest chips) just couldn’t and Apple had a problem on their hands. So in 2006 Steve Jobs announced that they had been planning for this contingency for years and that they had OS X running on x86 processors too. In fact after making the announcement he mentioned that all the demos he had been running to show off Apple software the earlier in the talk had been running on a Pentium 4 computer and not a PowerMac as you would have thought. It was an “Oooo” moment and for more than one reason.
Soon there were people thinking now that Macs were just fancy Intel boxes, why not try to run Mac OS on any Intel Box. Well there were a number of reasons this was a problem. Mac’s were built around a very specific set of hardware and the drivers required to get it working on anything but those setups didn’t really exist. Also Mac’s don’t use a standard BIOS that most Windows computers used to start up. Instead they used what is called an EFI (extensible firmware interface, but you don’t need to know that) which is basically a fancier, more modern BIOS-like system. This made it possible for them to limit the number of machines that Mac OS would boot on. No Apple hardware, no can do. The thing is, computer nerds are amazing. And so in no time there were people hacking the system to work on specific sets of hardware, but you couldn’t use software update a lot of the time and things were more buggy. Definitely not the kind of system you want to rely on. This is where we were 2-3 years ago.
Now we’re in a whole new world. Hackers have gotten around just about every problem with solutions which are elegant and fairly easy. So if you’re an enthusiast who has built their own computer from parts before, or a tinkerer what wants to try (it’s really not hard. No soldering or anything, just plugging stuff in) you too can build a custom computer which runs Mac OS X. A Hackintosh. I’ve been running one for over a month as my main desktop production machine and have had nary a crash.
Let me say a couple things here: One, I wouldn’t do this for my Mom. There may be unforeseen complications in the future and you can’t bring it to the Genius Bar to get fixed. That said, there is a rabid community of people online who go out of their way to make this stuff work. If you follow their advice, you’re in good shape. System software updates 10.6.5 > 10.6.6 for example, just wait a day before you install them so people smarter than you can figure out any problems and workarounds. And Two: It may not be technically legal. The EULA (End user licensing agreement) that comes with OS X Snow Leopard says it’s only useable on an Apple Computer. I think that’s crazy. If I’m buying the software (which I have) I should be able to do what I want with it in the privacy of my own home. For what it’s worth, Apple hasn’t ever sued any individuals for doing this. They did shut down a company who was building them and selling them online. For personal use, I wouldn’t worry about it.
So where do you start? Well you need to buy the parts and build the computer. The building the computer part is fun, and Ars Technica just posted a long form guide about what’s involved. It even walks you through each step.
http://arstechnica.com/ask-ars/2011/04/how-to-build-your-own-computer-ask-ars-diy-series-part-i.ars
But which parts to buy to make your machine as Hackintosh friendly as possible? There are a number of sites all over the net talking about Hackinoshes but the one I’ve stuck with is http://www.tonymacx86.com/ Great blog with news, great forums for tips and tricks and information. Best of all, the people on this site have specific sets of components that they’ve tested to work great as a Mac which they call CustoMac Builds. Mostly it’s about getting the Motherboard, Processor, and Graphics Card right. For a number of reasons, certain Gigabyte brand motherboards seem to be the way to go. The hard drives, case, power supply, dvd drive, fans, keyboard, mouse, etc don’t really matter as much. Either way, we’re talking serious machines which rival and beat the 4 core Mac Pro’s for around $1300. In fact they even specced out a CustoMac Pro last fall for $1224. I’d imagine those parts are even cheaper now. This leaves you plenty of money left over to buy a nice NEC monitor like their latest 27″ beauty.
Once you’ve got the computer built and booting, the process basically involves 4 steps. First you boot with an iBoot CD you’ve burned from a TonyMac download. You then replace that CD with the Mac OS install disc and install MacOS. Then reboot using the iBoot cd again, but instead of going into the installer, you boot into Mac OS from your hard drive. Then you use the system update you download from Apple to bring your computer up to 10.6.7 or whatever is current and before you reboot you run the Multibeast utility to install all the drivers you need to boot without iBoot and run Mac OS on your hardware. Sounds complex, I know, but it’s really not that bad. And once you’ve gotten the hang of it, it’s second nature. Seriously, there are specific walkthroughs for specific builds, but here’s the generic one.
http://tonymacx86.blogspot.com/2010/04/iboot-multibeast-install-mac-os-x-on.html
Usually the gear that’s most compatible is one step behind the cutting edge. If you want to use the latest $800 video cards, you might have problems. Or if you want to build a system based on the latest Intel Sandy Bridge processors, you might want to wait until they get the kinks out. For instance am running an Intel Core i7-920 processor, overclocked to 3.2GHz on an Asus P6T motherboard with 12GB of RAM installed. I didn’t build this machine to be a Hackintosh, it’s one I had built over two years ago for around $1400 which still benchmarks as fast as a $3400 current Mac Pro. That said, it runs Mac OS just fine, and those are facts that I’m just fine with. So follow their guides to the most compatible setups and you should be good.
Personally I find running a Hackintosh as my main box very satisfying. There’s something smirk-worthy about making something do something it’s not meant to. And doing it well to boot. I’m going to write another post about how my workflow and backup system has changed with my switch to Mac OS, as well as a bunch of neat keyboard commands and timesavers I’ve been taught or figured out. It’s like going 0-60 in 3 weeks. Exciting.
Photo Computer Buyer’s Guide Part 2 – Buying a Mac
 This is the follow-up to my post a couple days ago, the aptly named ‘Part 1’. In it I talked about the 4 most important parts that make up a photo computer and what you’ve really got to worry about. Today I’m going to get into specific machines. Now some people will rip me for only talking about Macs, but that’s largely to do with the fact that there are a million different Windows machines out there and at least the Apple line is a manageable post topic. Most of what I’m going to say would apply to a PC too, just figure out which model is most similar and you’ll get a good idea. Let’s jump right in with the laptops.
Macbook Pro
The latest “Sandy Bridge” revision to the MacBook Pro from a couple months ago makes them an almost desktop replacement for me. Finally we have laptops with processors which are as faster or even faster than a desktop. In fact the new 15″ beat a recent 8 core Mac Pro in Photoshop benchmarks. And with the new crazy fast Thunderbolt connection on there with drives being released soon, the little internal hard drive isn’t so bad either. Get a nice 120GB SSD as a boot drive and keep your images files on a nice big external drive or RAID array. The internal screens are decent enough for most use, though I personally wouldn’t base final decisions on one. Hell you could even get yourself a nice NEC screen (they just released a new 30″ with DisplayPort).
So you say, “Perfect Bill, what’s the problem? Connect an external disk and monitor and I’ve got a workstation that can also be mobile when I need it. Plus, I get a nice additional screen on the laptop for palettes and such.” This is all true and it’s a great idea. My problem with it is two fold. First, it’ll cost a lot, but then most of these options aren’t cheap. Mostly the problem is RAM, the laptops have only two memory slots on them. From Apple, this limits you to 8GB of RAM. Which is a lot for a laptop a few years ago, but not quite enough for me as my primary machine. You may remember that I’ve got 12GB on my current desktop and was thinking of upgrading. This depends a lot on how you process your images though. If you’re a Lightroom or Aperture guy and do only minimal edits in Photoshop, then you’re probably fine with 8GB. In which case this might be a great solution for you if you need portability.
In the past month or so, OWC has released a 16GB kit for this new machines. That’s two 8GB so-dimm modules. That’s pretty amazing. 16GB gets you in the territory where I would use this as my only computer. The problem is that those 16GB cost $1600, or about the cost of the laptop itself. Highest capacity memory modules are always at a crazy premium. It was only a couple years ago that 4GB dimms cost hundreds of dollars each. Now an 8GB upgrade kit with two of them costs $100. So maybe it’s a matter of time, but that’s a pill that’s a little too hard for me to swallow.
“How about the Air?” you ask. With a max of 4GB of RAM, a slow old Core 2 processor and a 128GB SSD, I’d say the Air is currently not an option for a serious photo machine. Would I get an 11″ to take with me on shoots and shuttle through doing selects in Lightroom? Sure, but that’s not worth $1200 to me right now. That said, the Air has a much better screen than the low-end Macbook.
Speaking of the MacBook, we’re talking about people who are looking for a photo editing computer here, so I’m going to skip over the low-end macbook because I’ve found the screens to be greatly inferior to the Macbook Pros and they come with a 2 year old processor and half the RAM. If you’re going to spend $1000, spend $1200 and get the low-end 13″ Pro.
Ultimately for me, I don’t need to edit on the road very often and I like a big screen. So the laptop as a workstation doesn’t float my boat considering the price premium. You however may love the idea of bringing your system with you wherever you go.
iMac
The current iMacs are pretty great as well, and though they are a generation behind the Macbook Pro from a CPU point of view, I think it’s a matter of weeks before they’re upgraded. So if you’re thinking of buying one right now (April 2011) wait.
Of course, the cool part about the iMac is that you get a nice big screen almost for free. In fact the 27″ is a pretty good panel. Not as good as a pro external monitor because of it’s glossy glare-exploding nature and lack of internal LUTs (see Part 1 of this series for an explanation), but if you’re on a budget, you could do far worse. Plus you’ve got a display port on the back, so you could always upgrade to an additional pro monitor later.
As far as RAM goes, the iMac uses the same so-dimms as the laptops do, however instead of 2 slots, it’s got 4 (the new ones that is, older ones had only 2 slots as well). These 4 slots can each take a 4GB dimm which gives you 16GB of RAM at a very reasonable price. The kits are about $200 from aftermarket dealers. Don’t buy your RAM from Apple, they charge three times as much for the same 16GB. Those giant 8GB OWC dimm will work in here too apparently, which gives you a maximum of 32GB which is amazing and more than you’ll ever use. That said, the memory would cost you $3200, so that $200 you were going to spend for the 16GB looks like the realistic max.
The achilles heel of the iMac is storage, though it’s less of a problem than it used to be. There is normally one internal hard drive in an iMac. In this last revision, Apple added the option of having an SSD & a hard drive at the same time which is pretty cool. That said, they charge you $900 for the trouble. That’s a lot of money for what you get. You could then use a Firewire 800 drive as an ok level backup to bolster your overall capacity.
The better idea would be to wait for the next revision of the iMac itself which will, I’m sure, contain the new Thunderbold port. The nice 27″ screen, 16Gb of RAM, an internal SSD for boot and applications, and then an external array of disks for storage would be an amazing bank for your buck. Could could put the whole thing together for less than $3000 and it would scream. There is a setup that would get my seal of approval.
Mac Pro
The granddaddy of the Mac line is the big pro desktop. Used to be the PowerMac back in the day and is now the Mac Pro since the Intel switch a few years ago. These are very nice machines that hold their value far better than they should based on the tech in them. Seriously, go look on ebay for 2-3 year old machines and you’ll find some for 70% what they went for new.
They’re big and with that size you get capacity. Up to 12 cores, 32GB of RAM (64GB if you go aftermarket), 4 internal slots for hard drives which with today’s 3TB drives could give you 12TB of internal storage. This thing is a beast, and you pay for that capability. These things start at $2500 at the very low-end and quickly get to $3500 or far more with just a few clicks of the upgrade mouse. If you are going to buy a Mac Pro, don’t buy extra hard drives or RAM from Apple. This machine is build to be upgraded, the hard drive caddies are right there to pull out when you open the side of the thing up.
The main thing you’ve got to worry about when buying a Mac Pro is the CPU. And it comes down to how many cores you need. For video guys or 3D rendering, the 12 core beasts are great. For photo stuff, they’re overkill in my opinion. 4 or 6 cores is plenty. You can disagree and that’s fine, it’s your money but it’s my blog. Trust me, get a nice fast single processor machine and load it with RAM.
Downsides are still there with the Mac Pro line. Price being the main one. Go spend $3500 on the box and then another $1800 on a nice monitor and you’re up around $5000 for a system which to me is crazy for what you get. You see, part of the reason Mac Pros are so expensive is that they use server chips, Intel’s so-called Xeon line of processors. Basically they’re the same as the i7 that is in the high-end iMac except they can be used in systems with multiple CPU. But if you’re only buying a Mac Pro with a single CPU like I suggested above, then that capability of the Xeon is moot. That’s all Apple sells however, so you’re basically spending extra money on a part you don’t need.
Ideally there would be a plain old Mac desktop in the Apple line. A smaller Mac Pro chassis with a single processor and room for 2-3 internal drives. Basically a headless iMac without the screen and with more space for drives. They don’t have this however, so you’re stuck choosing between ‘less than you want’ and ‘more than you need’. If money is no object then go trick out a nice $5000 Mac Pro. I myself can’t justify it for what you get.
Best Bets
So Bill, what does this all boil down to? Well, basically one of two options if you’re not planning spending more than $3000
If you want a desktop and you’re on a budget, and really want to buy genuine Apple hardware, my suggestion is to wait a few weeks until the new iMac comes out. As I said above, buy the top of the line 27″ with an SSD internal drive, upgrade the RAM to 16GB from OWC or similar aftermarket company, and get an external drive enclosure to plug in via Thunderbold. This setup would cost you less than three grand and would absolutely SCREAM. Seriously, if I were in the market right now, I might go that route.
If you absolutely need to go with a laptop. Get the fast version of the 15″ MBP. When you get it, upgrade the RAM to 8GB and replace the internal drive with a nice fast SSD like the OCZ Vertex 2 which are about $200 for 120GB. Should be enough capacity for your internal drive. You’ll probably need to carry around a little external on long trips. Just be sure to get the anti-glass high-res screen option when you order. It’s really pretty nice, has lots of real estate (1600×1050), and is a bit easier on the eyes than the glossy model.
There is one other option to consider however and that involves getting your hands dirty a bit. The rewards however, can be amazing. So in part 3 I’ll discuss Hackintosh a bit.
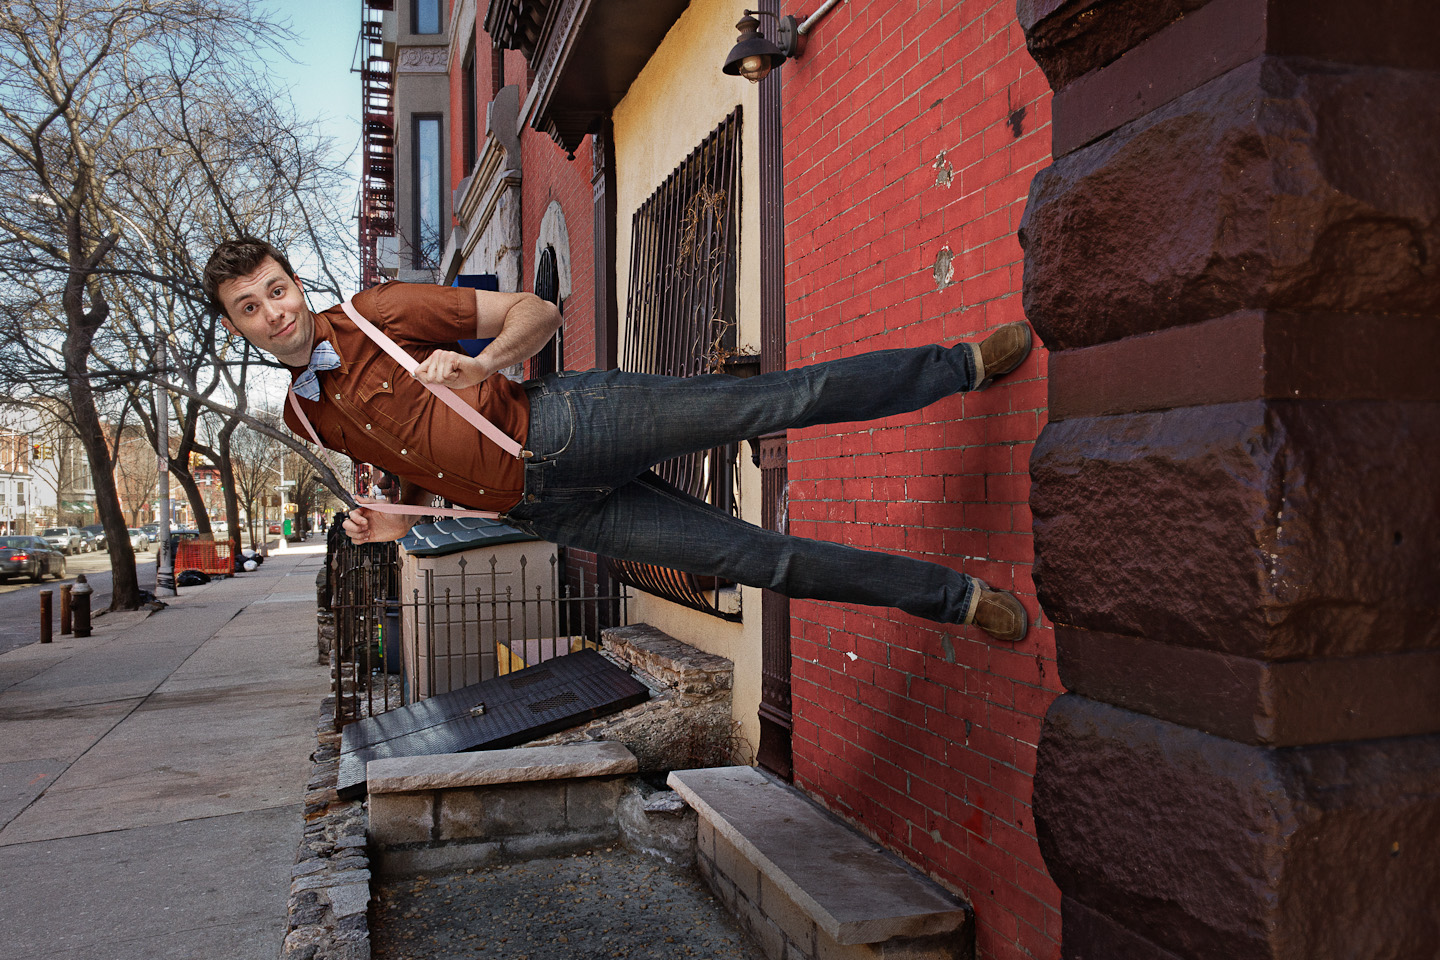
The making of “Gatlin on the Wall”

Click the image above to enlarge.
Jeffery Saddoris over at Faded & Blurred wanted to see a behind the scenes (that’s BTS for the hipsters out there) of the picture I posted last week of Gatlin standing on the wall. And as I do anything he tells me to, here you go. My intention is not to go through every key and pen stroke, but rather walk through the main steps so you get the idea of how this is all done.
It all started with a vague idea of having Gatlin standing cool on a wall. As if he belonged there and it was no big deal. I wasn’t sure which wall or if it would work exactly. Being one of my 365.2011 shots, it was about doing something different and interesting.
Before Gatlin showed up, I took a walk out in front of my building in Brooklyn and looked for a wall. The cafe next door had this pretty great red brick wall that I though might do the trick, so I setup my tripod and took some shots. Swapped lenses a bit to get it right, ending on my trusty 28mm prime. Always trying to imagine how a person might fit into the frame. Since I wasn’t doing any scale shifting (making something smaller or larger than they are), it’s best to use the same lens for each element of the shot, that way the perspective and any lens effects stay constant. That makes it easier to blend the two in the end. In fact, placing the person in the same place in the frame that they’ll be in the final shot really helps. Allowing you to overlay the two and just mask them in. There’s more to it than that of course, but we’re getting ahead of ourselves.
So here’s the picture of the wall in front of the cafe. I call this a ‘plate’ because it’s the base image that I’m going to put other elements into. This is right out of the camera and as you can tell, pretty boring. In fact, it’s not a very good picture at all. That said there’s more to it than just taking the shot. You’ve got to rotate your thinking a bit and remember that he’s going to be coming out 6 feet from that wall so make sure you give them enough room. I also measure from the camera to the plane where I think he’s going to be, and the distance from the camera to the wall. You’ll need this when we shoot Gatlin.

The next step is taking the plate and working on the contrast and such. Yes it’s a wall near my house, but it’s also got to be an environment where a guy standing on the wall doesn’t look stupid. A little too contrasty at this point? Maybe, but this is fine for now.

About an hour later, Galtin showed up. Now, I’ve never met him before, set the whole thing up via email, so I was in for a surprise because he’s a very tall guy. 6’8″ or thereabouts. This isn’t a problem per say, except that in taking the plate I left space for a more typically sized person. But in the end this was a blessing because it gave me the idea of having him twisting as if trying to get his face in the same orientation as the viewer. Which in many ways makes the shot.
As you can see, I shot him on some white paper. Arguably, a green screen would be easier, though I’ve always found that I have to end up doing so much of the masking work by hand anyway that it isn’t worth the trouble for a single picture. Plus there’s the green fringing everything picks up from reflections.
To get the angles right, you need to measurements you took outside. Set the camera/tripod to the same height as the distance the camera was from the wall outside. Then mark a spot on the paper based on the distance from the camera where you imagined him standing. The only other variable is the angle of the camera. as you can see, I was turned a little to wards the wall outside. ‘Looking down’ a bit if you turn your head and look at the picture below. I dealt with this by lining up the right most focus point in my 5DII with the spot on the wall where I imagined his feet would be. Then when I shot him I panned the camera down until that same focus point was on his feet. I didn’t use it to focus, it just happened to be a good marker to align to.
When you’re lighting things like this, you’ve got to think about how the light would fall on him in the final image. That is to say, from the sky above which is to his left in the picture. I ultimately wanted it to look like I filled a bit with a high softbox above the camera as well, so I brought that key light out in front of him a bit. I think I used two softlighters, one big one to his left to mimic the light and another camera left to fill in shadows. This doesn’t have to be perfect at this point, but the closer you get, the less work in post.

So if we just cut him out and drop him into the shot, this is what you get. Basically it looks exactly like it sounds and that’s not good. The overall perspective is pretty close, and he fits fine, but the color and contrast is a bit off, and the lack of shadows makes it very obviously fake.

So the next step is to add some shadows below Gatlin. As I mentioned, I wanted it to look like there was more than just the sun lighting him. Maybe a softbox a few feet above the camera position. Therefore the shadows are not right below, but also falling away ‘behind’ him as it were. On top of the big soft shadow, you’ll also need darker harder ones under his feet anywhere the shoes would be lifted off a half inch or less. That’s what really creates the illusion that he’s sticking to the wall.

The last image is close, but there’s still a disconnect between him and the plate. So it’s time to go in with some masked curves layers and shape the light a bit more. This involves darkening the side of his body that’s closest to the ground and adding some contrast to the rest. A little color correction here and a tad saturation adjustment there and we end up with the image below. Looks pretty good, but not quite finished.

The final thing I like to do is add a some vignetting to make him pop off the background a bit. To make it seem more like a deliberate portrait and not a composite.

So there you have it. Two pictures and a couple hours of obsession in Photoshop. As a general rule, I’m not a meticulous photographer. I’m not constantly thinking about every setting and angle, but when you’re doing artistic composites like this, it’s being obsessive about those kinds of details that make the difference between silly and believable. I hope you found this interesting.